Homemade Orange Curd (Microwave)
Homemade orange curd made faster in the microwave delivers a creamy, addictive spread for scones and biscuits. It’s also great as holiday gifts and better than store-bought!

They say when life gives you lemons, make lemonade. But when it gives you oranges, please make orange curd. I love lemon curd, and during the holiday season, there are recipe after recipe for it. The time I’ve spent in London is to blame for all the jars of lemon curd I’ve used on cakes, scones, and biscuits.
However, last holiday season, I decided to skip the lemon curd aisle and make my own. But when I got to the produce aisle, I couldn’t resist those gorgeous oranges. And why not?

Why Make Your Own
Whether oranges are in season or not, it’s no better time to whip up a batch of this creamy, addictive curd. Depending on how far the oranges were shipped, they can be less sweet and flavorful. Adding a little sugar and turning them into a curd saves what the family may not have been so excited about eating.
Since oranges are plentiful more often around the holidays, homemade curd makes beautiful gifts that say I love you without taking up too much time. Besides, foodie and non-foodie friends will be happy.

If that isn’t enough to convince you, let me tell you how easy it is to make in a microwave. Minimal whisking means your arms won’t fall off like in the traditional stovetop method. You can have your cooked curd in about 5 minutes, and then relax and listen to Christmas carols while it cools and thickens even more.
How to Make Orange Curd in the Microwave
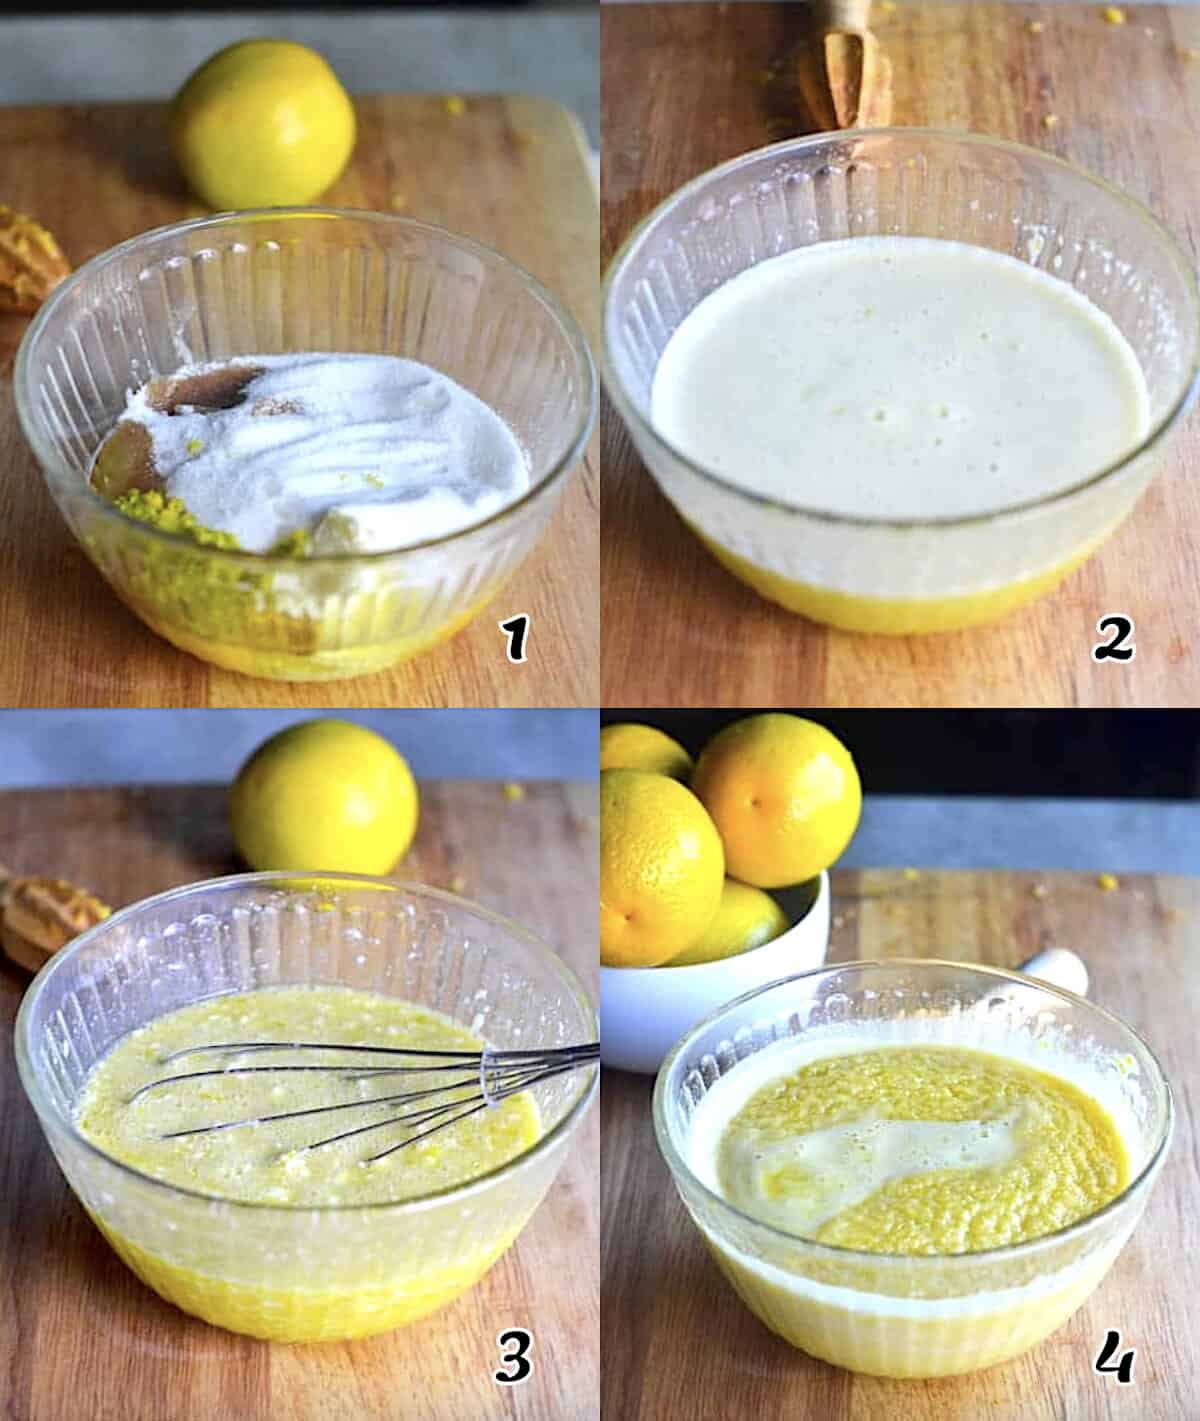
- Dump all the ingredients into a microwave bowl. Whisk everything for about 30 seconds or until thoroughly combined.
- Microwave in 1-minute intervals, stirring between each blast.
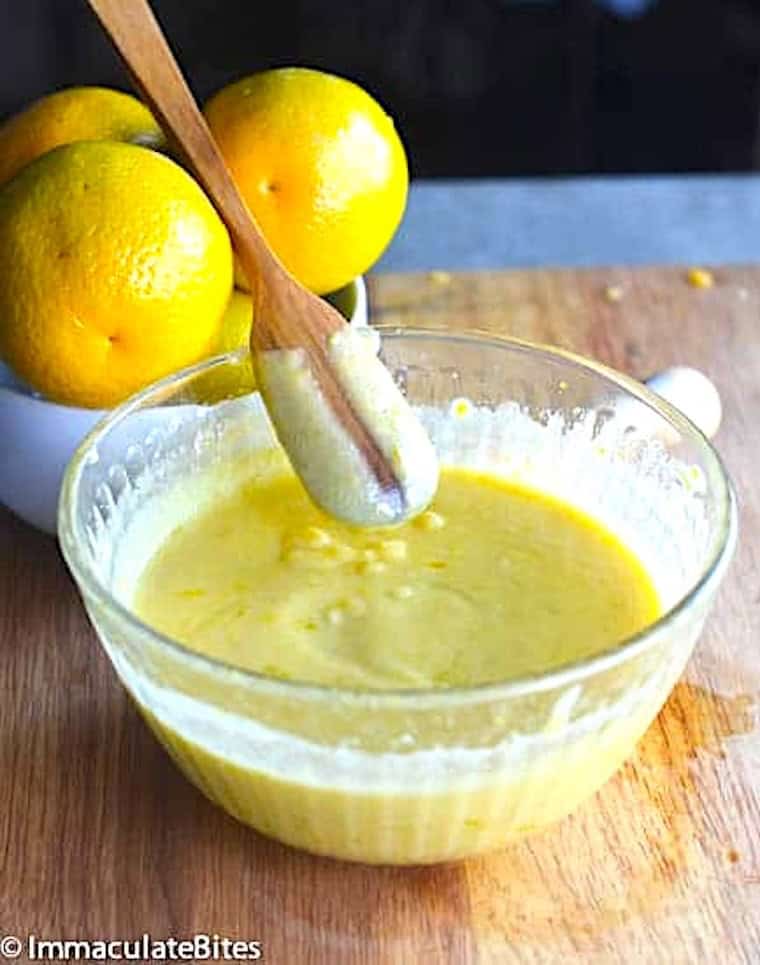
- Done – After 4 minutes, it should be bubbly and start thickening. When the mixture coats the back of a spoon, you’re done.
Recipe Tips
- If you’re lucky enough to have sweet, juicy oranges, you can reduce the sugar to your liking.
- I used 3 eggs, but you can add 2 egg yolks for a richer, creamier curd.
- Lime gives an extra zesty tang, but lemon works just as well. They have something that makes them a fantastic flavor enhancer.
Storage Instructions
Pour the hot curd into a heat-proof glass jar, cover, and let it cool at room temperature. Then store it in the fridge for up to 3 weeks. The sugar helps preserve it.
For freezing, put the cooled curd into a freezer-safe container and freeze it for up to 6 months.

How to Use Orange Curd
Enjoy serving this to your guests with scones or biscuits and watch them go crazy! Stir half a cup of it into your favorite cheesecake recipe for more flavor. Or drizzle it over pineapple coconut ice cream for a triple tropical twist.
More Addictive Fruity Sweet Treats to Try
By Imma
This blog post was originally published in December 2013 and has been updated with additional tips and beautiful photos.
Orange Curd
Ingredients
- ½ cup (113g) butter at room temperature
- ¾-1 cup (150-200g) sugar (adjust to preferred sweetness)
- 3 eggs
- ½ cup (118ml) freshly squeezed orange juice (about 2 oranges)
- 2 tablespoons (12g) orange zest
- 2 tablespoons (30ml) lime juice (1 large lime)
- 1 tablespoon (6g) lime zest
Instructions
- In a large microwave-safe bowl, whisk all the ingredients, butter, sugar, eggs, orange juice and zest, and lime juice and zest, until smooth.
- Zap in the microwave in one-minute intervals, stirring after each minute until the mixture is thick enough to coat the back of a wooden spoon. It shouldn't take more than 4-5 minutes, depending on your microwave. It always takes mine about 4 minutes to thicken.
- Remove from the microwave, pour into a glass jar, cover, and cool. Then seal the jar and keep it in the fridge. It lasts for up to three weeks.
Tips & Notes:
- Zest the citrus before juicing, and keep the extra zest to enhance the flavor of salad or soup. I like to dry it and add it to my ginger tea.
- Feel free to replace the lime with a lemon if that’s what you have.
- Please remember that the nutritional information is a rough estimate and can vary significantly based on the products used in the recipe.


Mine never thicken even after 12-14 minutes 🙁 It was even boiling. I added slurried cornstarch to thicken it
Can you use lemon juice instead of lime juice?
Yes, you can use lemon instead of lime 🙂
So sorry that happened Slsalmin. I have no clue why, but a cornstarch slurry is a great save.
Can you freeze orange curd?
Hello Tammy. Yes, you can! Keep in an airtight plastic container. When thawed, it can last for up to a week in the refrigerator.
Hi, Katrina. Recipe box updated with metric measurements. Happy holidays!
Another way to make this is to mix all ingredients minus the eggs. Heat to boiling in the microwave then pour onto the beaten eggs while whisking. May need extra few seconds in microwave if the eggs were very cold but usually thickens nicely as it cools.
Hi Maggie! Thanks for tip, I’ll definitely try it out soon. Have a great day!
This is a great recipe- really easy to understand and the pictures make it clear what it should look like at each stage, which is great for someone like me who’s never made curd before! I love that you can do it all in the microwave too! I adapted this for the middle of my chocolate orange cake and it worked really well.
Thanks 🙂
Thanks for the link back and so glad to hear it works for you!