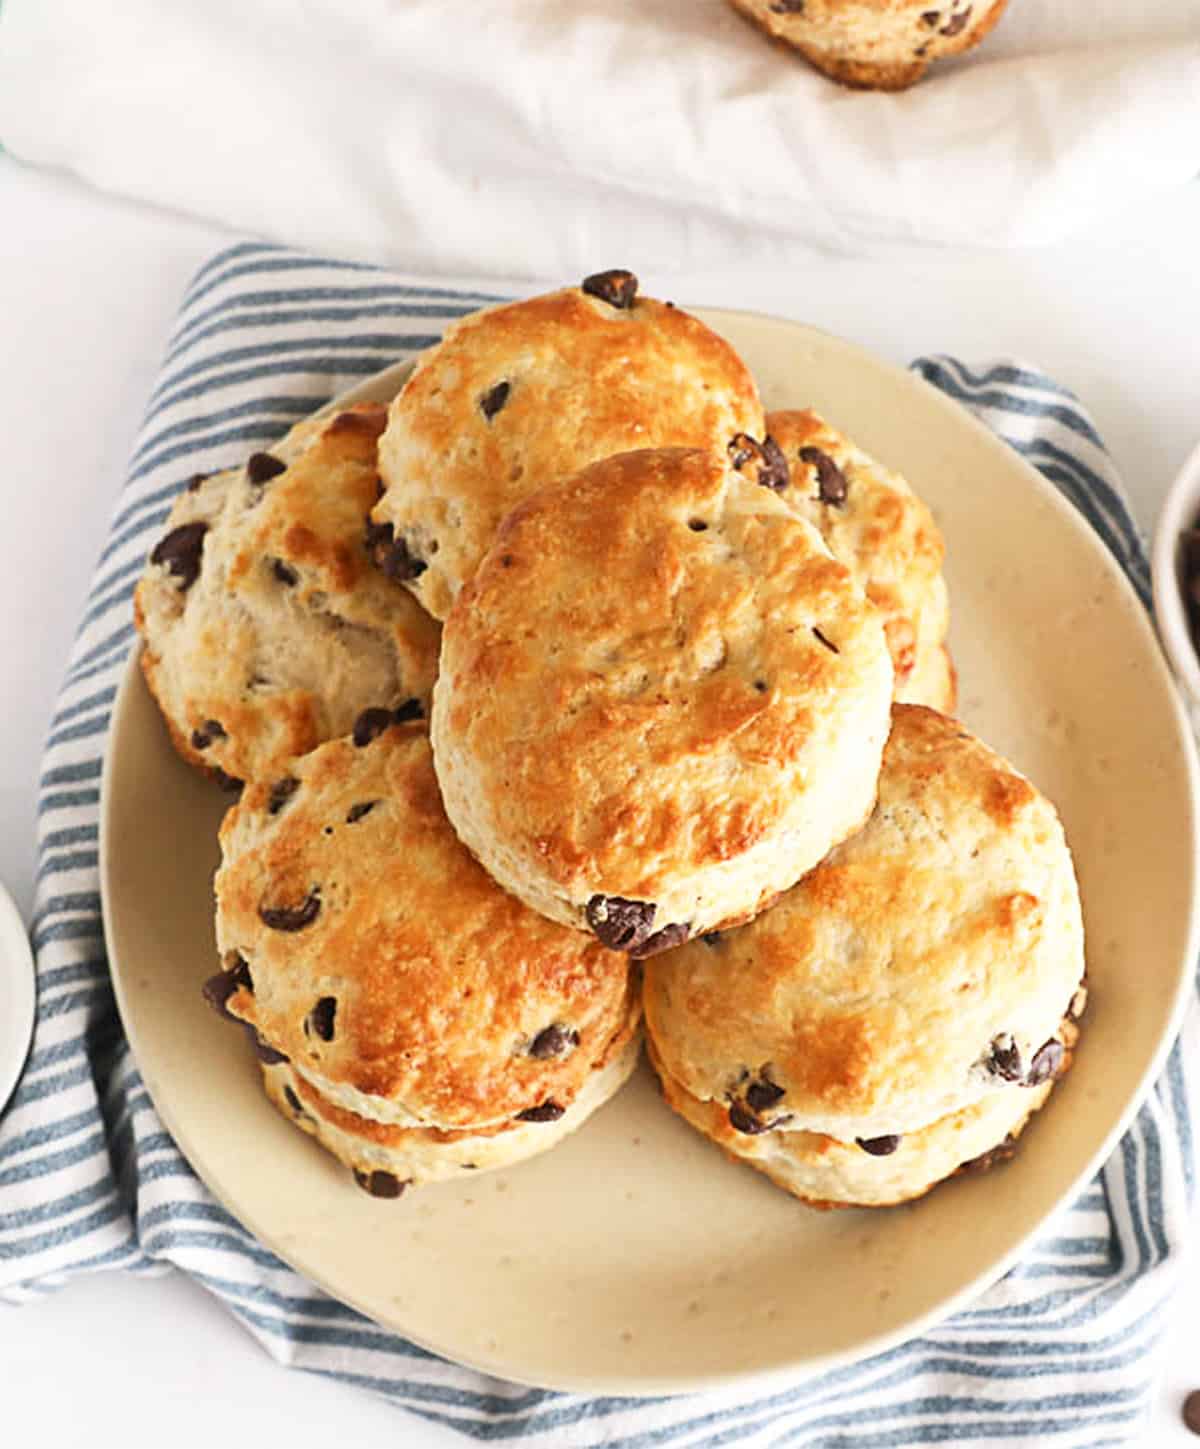
Chocolate Chip Scones
Chocolate chip scones are tender, buttery treats that will surely become the next family favorite! The dense yet tender bite delivers melt-in-your-mouth satisfaction. Just the right amount of chocolate in every bite makes an irresistible breakfast, brunch, or afternoon tea addition!
My many visits to London got me in the habit of afternoon tea with scones. My Auntie insisted on the best of the best for her niece. Sitting down to a plate of warm, flaky, freshly baked scones and enjoying a heartwarming conversation was so comforting.
And since chocolate chips make everything better, these scones take afternoon coffee to the next level. Not only that, they’re simple enough for a weekday breakfast yet elegant enough to grace any holiday brunch table!

Perfectly Tender, Buttery Chocolate Chip Scones
Cold ingredients are the secret to flaky, oh-so-yummy scones! Make sure your butter and cream are cold, and consider chilling your flour before you start. Once the scones are on the baking sheet, put them in the freezer to keep them cold while the oven is heating.
Additionally, handle the dough as little as possible when shaping your scones. The heat from your hands may melt the butter, which leads to less flakiness. Moist, slightly sticky dough delivers the best results. Let’s make this!

How to Make Chocolate Chip Scones
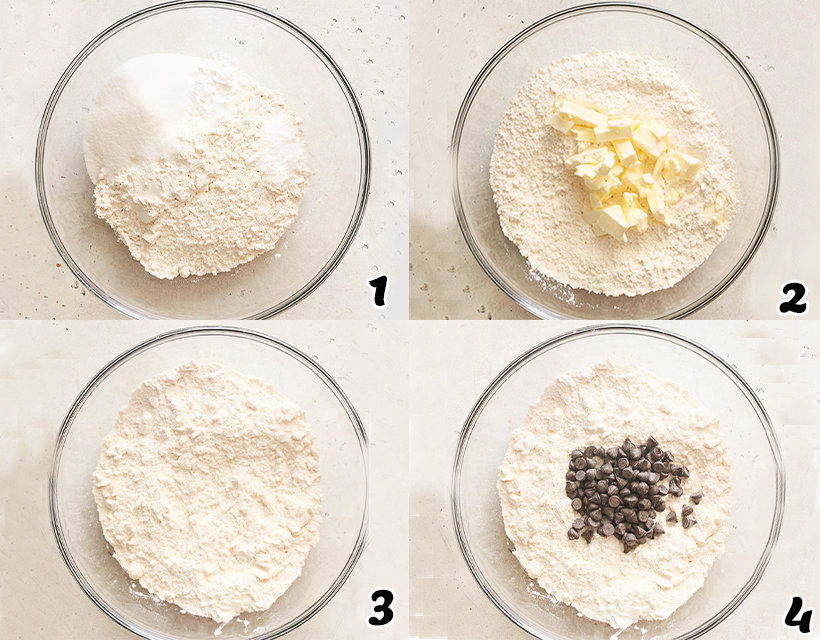
- Dry Ingredients – In a large mixing bowl, whisk flour, sugar, baking powder, and salt. (Photo 1)
- Butter – Quickly cut the butter into the flour mixture with your fingertips until the mixture resembles coarse crumbs (3-5 minutes). Or use a pastry cutter to do it. Stir the chocolate chips. (Photos 2-4)
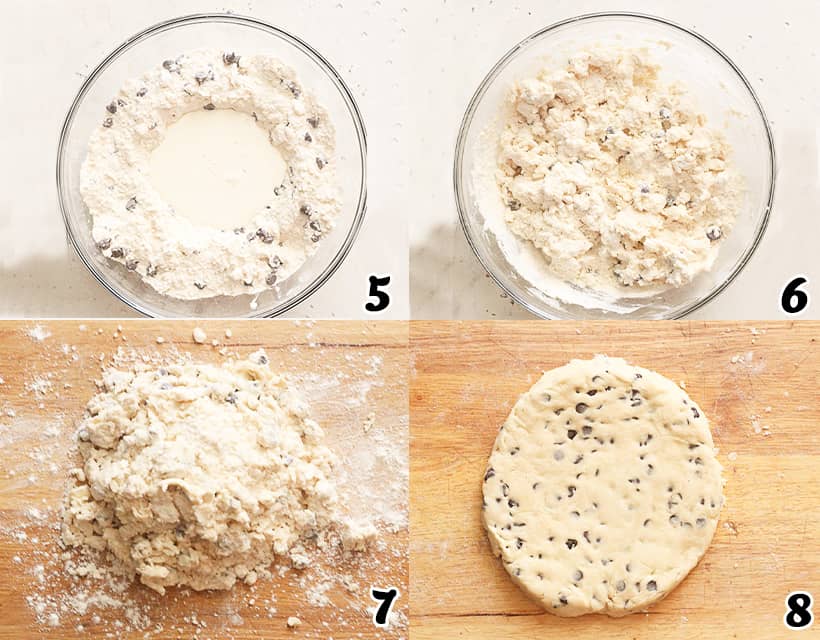
- Wet Ingredients – Make a well in the center of the bowl and add heavy cream and eggs. Stir with hands or a rubber spatula until it forms a rough ball (about a minute; don’t overmix). (Photos 5-6)
- Lightly Knead – Transfer the dough to a floured board or surface; then knead it 3-4 times, just enough for it to come together. (Photo 7)
- Form – Gently press the dough down to an inch thick. Cut the scones into circles with a 2-inch round cookie cutter or glass. Press the remaining scraps together and cut it again until the dough is used up. Or cut dough into eight wedges, like traditional scones, with a knife or bench scraper. (Photo 8-9)

- Bake at 400°F (205℃) for about 20 minutes or more, until lightly browned, but start checking after 10 minutes. (Photo 10)
- Serve – Remove, let them cool on a wire rack for about 5 minutes, and serve warm. Or cool completely before proceeding with the optional glaze.

Recipe Variations
- Chocolate variations. Feel free to use milk, dark, or white chocolate chips instead of semi-sweet for your chocolate chip scone recipe. Flavored chips like peanut butter, butterscotch, or caramel are also great!
- Glaze substitute. Instead of glaze, brush the tops with cream and sprinkle with sugar for extra texture and shine.
- Add-ins. Half a cup of dried cherries or cranberries complements the chocolate chips exceptionally well. Or replace half of the chocolate chips with chopped nuts such as pecans or walnuts. A teaspoon of vanilla extract always goes well with chocolate.
- Gluten-free. Make gluten-free scones by replacing the all-purpose flour with an equal amount of gluten-free all-purpose flour.
Tips and Tricks
- A hot oven is crucial for that initial rise and golden-brown crust. So preheat your oven before your scones go in.
- The foundation of a great scone lies in the quality of your ingredients. Opt for high-quality butter, fresh baking powder, and premium chocolate chips. Trust me, your taste buds will thank you.
- When cutting the dough for scones, press straight down with the cutter or the knife without twisting. That helps the scones to rise better.
- If you only have salted butter on hand, reduce the salt by ¼ teaspoon, and you’re good to go!

Make-Ahead and Storage Instructions
I love making the dough the night before, covering it with plastic, and storing it in the fridge. Then, in the morning, preheat the oven while cutting the scones and pop them in the oven for a delicious start to your day!
You can also freeze baked or unbaked scones. Prepare the scones as directed and freeze them on a baking sheet. Once frozen solid, transfer them to a plastic freezer bag and freeze them for up to 3 months.
Bake your scones straight from the freezer, allowing a couple of extra minutes of baking time.
Leftover scones last for two days in an airtight container on the countertop or about a week in the fridge. To defrost, leave them on the counter for about an hour, then warm them for 10-15 minutes in the oven at 300℉ (150℃).
FAQs
If the scone dough crumbles between your fingers, add a little more cream or water until it reaches the correct consistency.
Try freezing and grating your butter for the dough (freeze the flour and bowl, too). Refrain from handling the dough too much because the butter will warm too much. Add a little more baking powder to the dry ingredients. And lastly, a preheated 400℉ (205℃) oven.
While they look similar, there are differences! Biscuits have lard and buttermilk, which makes them lighter and flakier. They’re more savory than scones and traditionally served with gravy.
Scones, on the other hand, have cream and eggs, resulting in a denser dough. They’re usually sweeter, and the dense dough means they can easily handle additions like dried fruit and chocolate!
What Pairs Well With Chocolate Chip Scones
For a cozy afternoon treat, I love serving these scones with a rich pumpkin spice or chai tea latte. Or create a memorable holiday brunch by partnering them with fluffy pancakes and a cheesy croque monsieur.
More Tempting Scone Recipes to Try
- Cranberry Orange Scones
- Lemon Blueberry Scones
- Raspberry White Chocolate Scones
- Pineapple White Chocolate Scones
Watch How to Make It

Chocolate Chip Scones
Ingredients
Scones
- 2½ (300g) cups all-purpose flour
- 1 tablespoon (12g) baking powder
- 1 teaspoon (6g) salt
- ¼ cup (50g) granulated sugar
- 1 cup (170g) semi-sweet chocolate chips
- 8 tablespoons (113g) unsalted butter, cold and cut into chunks
- ½ cup (113g) heavy cream plus more for brushing the scones
- 2 large eggs
Glaze (Optional)
- 2-3 tablespoons (30-45ml) milk
- 1 cup (113g) confectioners' sugar, sifted
- 1 tablespoon (14g) unsalted butter
Instructions
- In a large mixing bowl, whisk flour, sugar, baking powder, and salt.
- Quickly cut the butter into the flour mixture with a pastry cutter or your hands until the mixture resembles coarse crumbs (3-5 minutes). Stir the chocolate chips.
- Make a well in the center and add the heavy cream and eggs. Stir with a rubber spatula or your hands until it forms a rough ball (about a minute, but don't overmix).
- Transfer dough to a floured board or surface; then knead 3-4 times, just enough for it to come together.
- Gently press the dough down to an inch thick. Cut the scones with a 2-inch round cookie cutter or glass. Press the remaining scraps together and cut again until you use up the dough. Or cut dough into eight wedges, like traditional scones, with a knife or bench scraper.
- Bake at 400°F (205℃) for about 20 minutes, until lightly browned. But start checking on them after about 10 minutes.
- Remove them from the oven, cool on a wire rack for about 5 minutes, and enjoy warm. Or cool them completely before proceeding with the optional glaze.
Tips & Notes:
- A preheated hot oven is crucial for that initial rise and golden-brown crust.
- Cut the dough for scones, pressing straight down with the cutter or the knife without twisting for a more attractive scone.
- If you only have salted butter on hand, just reduce the salt by ¼ teaspoon, and you’re good to go!
- Please remember that the nutritional information is a rough estimate and can vary significantly based on the products used in the recipe.