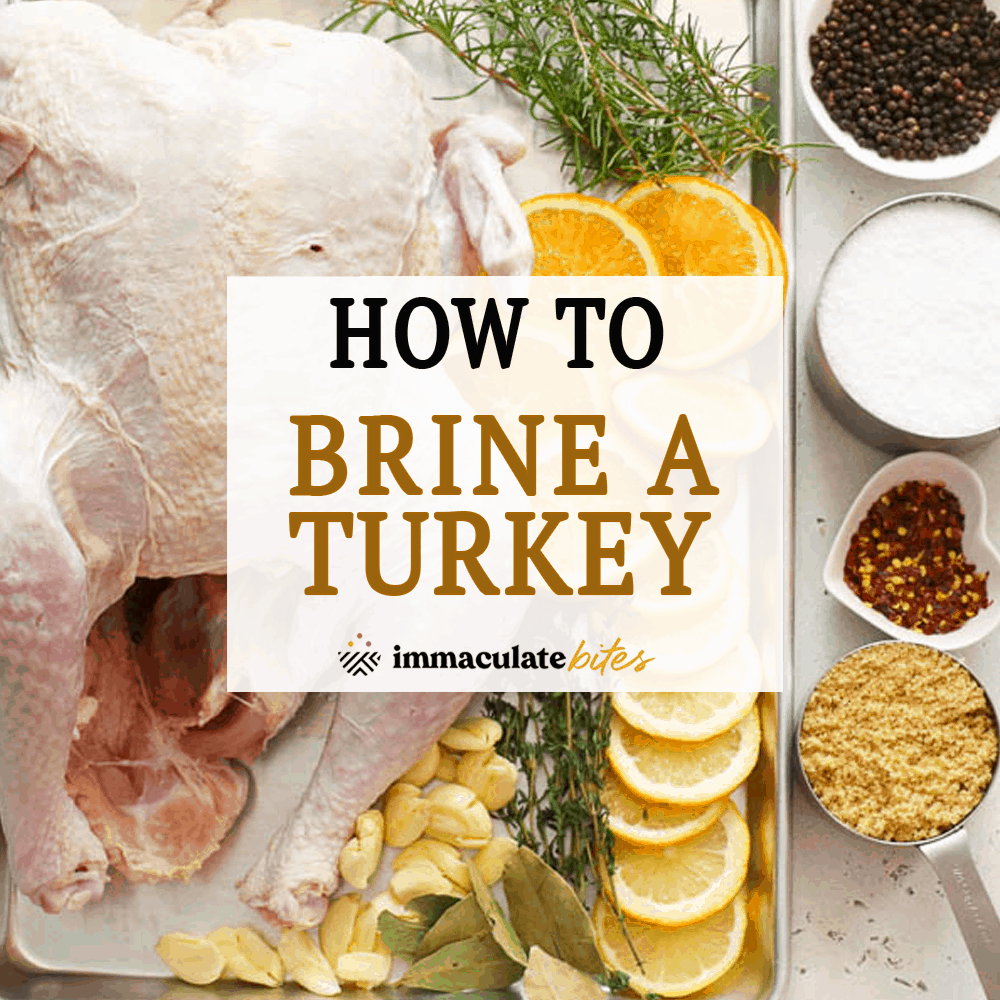
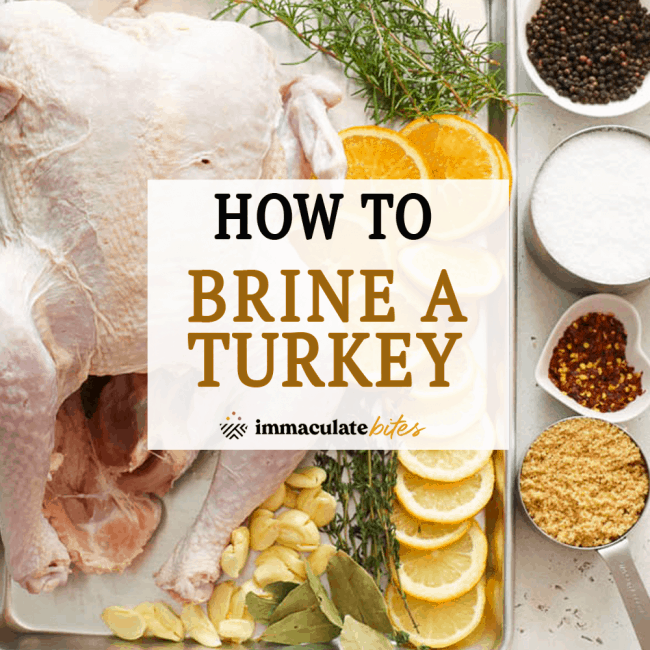
How to Brine a Turkey (Plus VIDEO)
Turkey Brine Recipe – It’s time to learn how to properly brine a turkey for a moist and flavorful Thanksgiving turkey. Let the zingy, herby, and fresh flavors infuse your turkey to the bone while making it super juicy!
Tell me if I’m wrong, but many start panicking a few days before Thanksgiving Day. And one major reason is the turkey. I know it’s the centerpiece of the whole show, but you don’t really have to stress about it.
And when you brine your turkey, you’re sure to impress the whole crowd. Nothing beats a tender, juicy, and flavorful turkey for the holidays. Today, I’ll show you how to make the best turkey brine that guarantees a flavorful bird.
Brining vs. Marinating
What is brining? And what makes it so different from marinating? Well, the main difference between the two is the purpose. Marinating mainly focuses on infusing flavor, while brining aims to make your main attraction juicier.
Marinade
A marinade is a mixture of different flavors, whether it’s herbs, spices, or sauces, and a good base. The base liquid is often acidic, like lemon juice or vinegar. But it can also be enzymatic (pineapple, for example). A good marinade tenderizes the meat for that easy fall-off-the-bone experience while adding flavor.
Brine
On the other hand, brining uses the power of salt (kosher salt being the best). The salt takes the water with it into the turkey for a juicier experience and intensifies the flavor at the same time. In addition, the salt tenderizes the meat and jazzes things up.
Types of Brine
Two types of brining can ramp up your turkey with juiciness.
Wet Brine
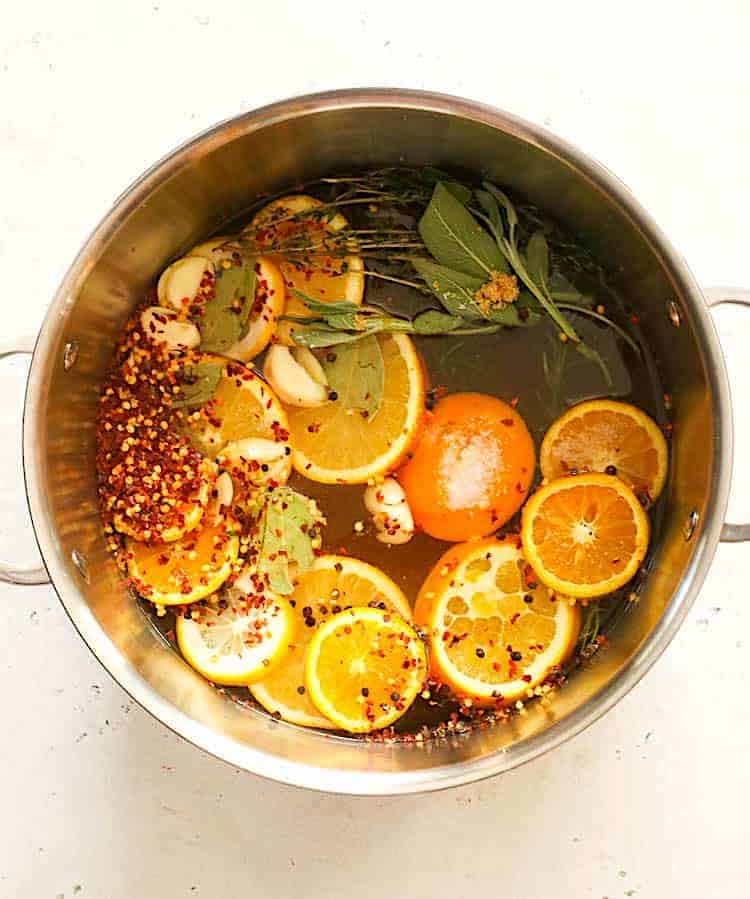
You may have heard of this method if you’ve Googled “how to brine a turkey” because it’s the most popular. All you have to do is to submerge the turkey in a saltwater solution and let the magic happen. You can also add your desired flavors, such as herbs, spices, and fruit slices, to the brine.
Dry Brine
Dry brining uses little to no liquid at all. Simply cover the whole turkey with coarse salt to draw out the meat’s natural juices. The liquid becomes a natural brine solution and soaks back into the turkey. Don’t forget to wash the salt off before cooking so it’s not too salty.
Why Brine Your Turkey?
If you’ve ever been on a diet, you may have heard you need lean meat. So people recommend chicken and turkey breasts with more protein and less fat. But they tend to be dry and bland. Why?
Cooking removes moisture from the meat, while fat helps keep it in for evenly cooked and moist meat. Because turkey breasts are lean, they can quickly dry out from the lack of fat and moisture.
That is where brining comes in. The meat absorbs the brine, including a good amount of liquid. The brine gives the meat excess moisture, so when cooking removes some, your turkey has a reserve, making the whole dish juicy.
Recipe Ingredients
Today, we’re working with a wet brine because controlling the flavor is way easier. Figure about a quart or liter of brine per pound of turkey. This recipe makes 2 gallons (8 quarts).
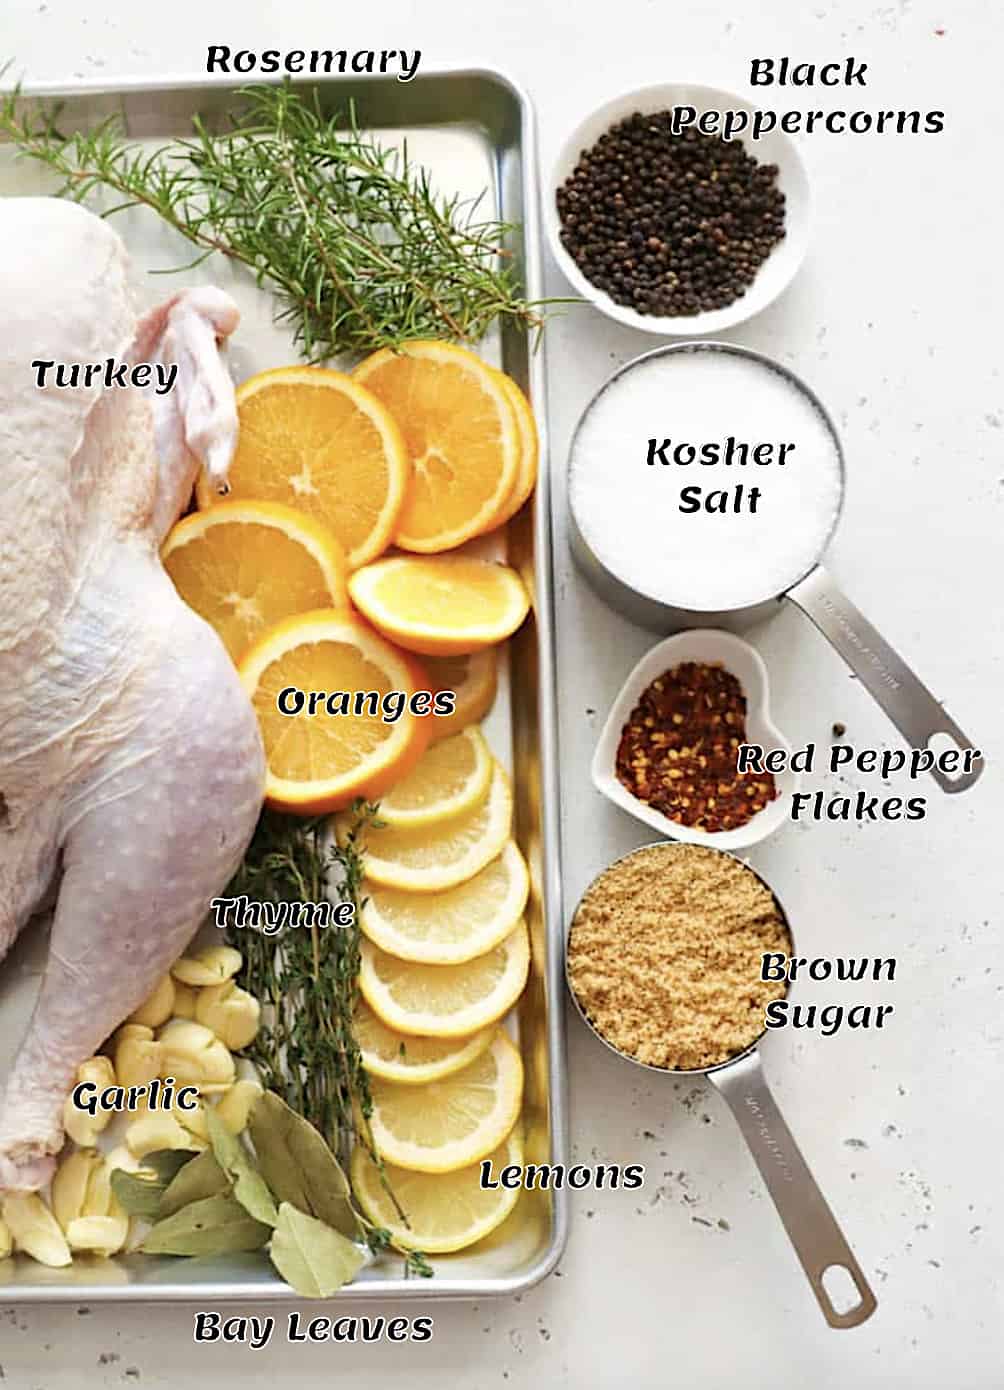
- Water – Lots of water to dissolve the salt and soak your turkey.
- Apple Cider – The acidity helps tenderize and flavor the turkey. Replace it with the same amount of water if you don’t have any.
- Salt – An essential ingredient for any brine, it tenderizes, adds flavor, and makes it juicy. Salt pulls moisture, then adds it back with style. Kosher salt, sea salt, or any salt without iodine or additives works best. So there’s no need to buy expensive salt.
- Brown Sugar – This ingredient does more than sweeten foods. It enhances flavor and promotes even browning.
- Seasonings – Garlic, thyme, rosemary, sage, bay leaves, and black pepper deliver an earthy and aromatic tone.
- Citrus – Orange and lemon provide more acidity for tender turkey and enhance the flavor as well.
- Red Pepper Flakes – Give your dish the perfect heat and excitement. The heat level is totally customizable.
How to Brine Turkey
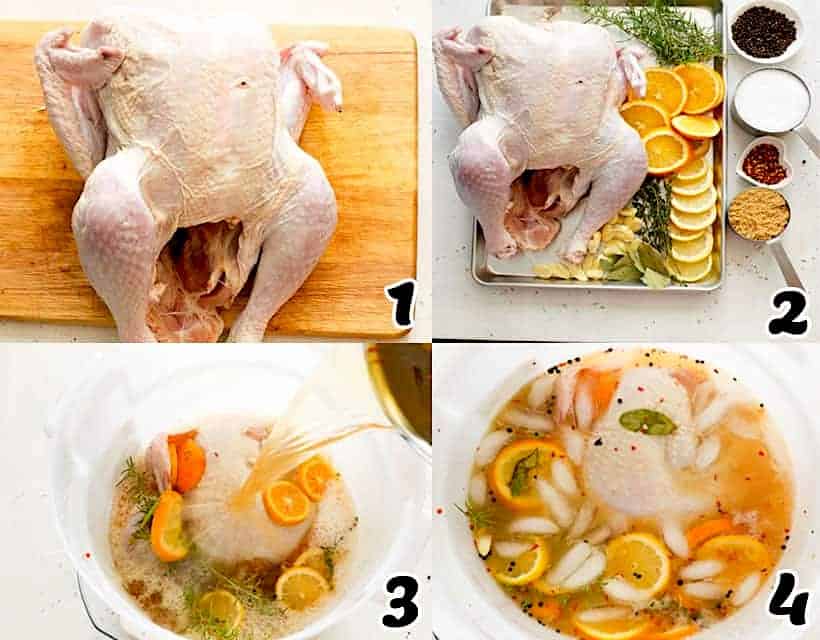
- Prep the Turkey – Discard any wrappings from the turkey, remove the giblets (save for gravy), and place it in your brining pot or brining bag (make room in the fridge if necessary). (Photo 1)
- Heat up about 4 cups of water in the microwave or stovetop until warm. The sugar and salt will dissolve faster. Remove from heat once it’s warm.
- Add Salt and Sugar – Pour in the salt and sugar, then stir until they dissolve. Let the brine cool, then add the remaining very cold water and apple cider. (Photo 2)
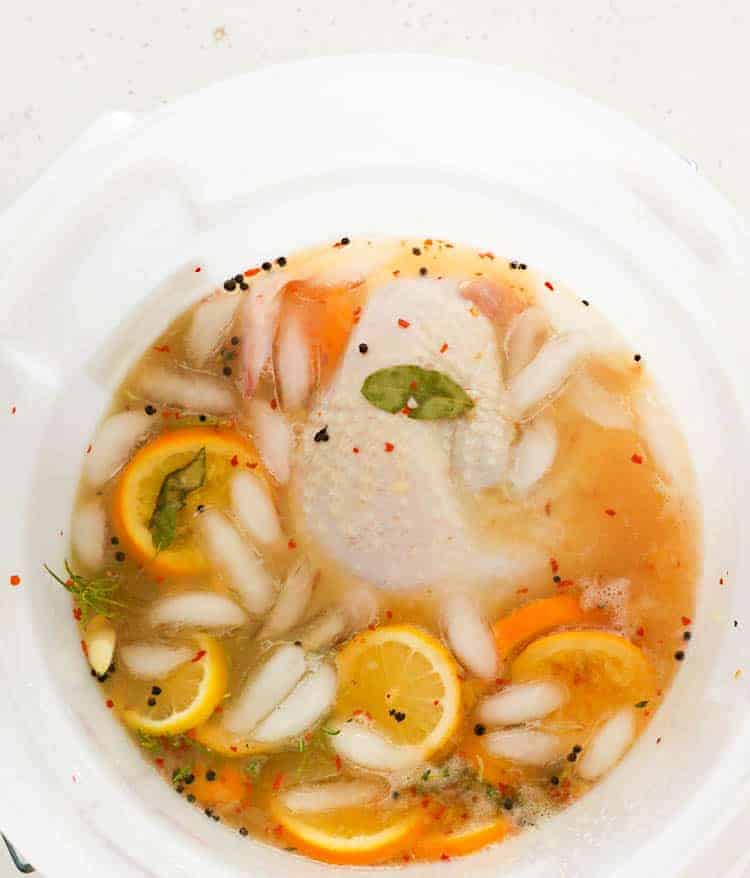
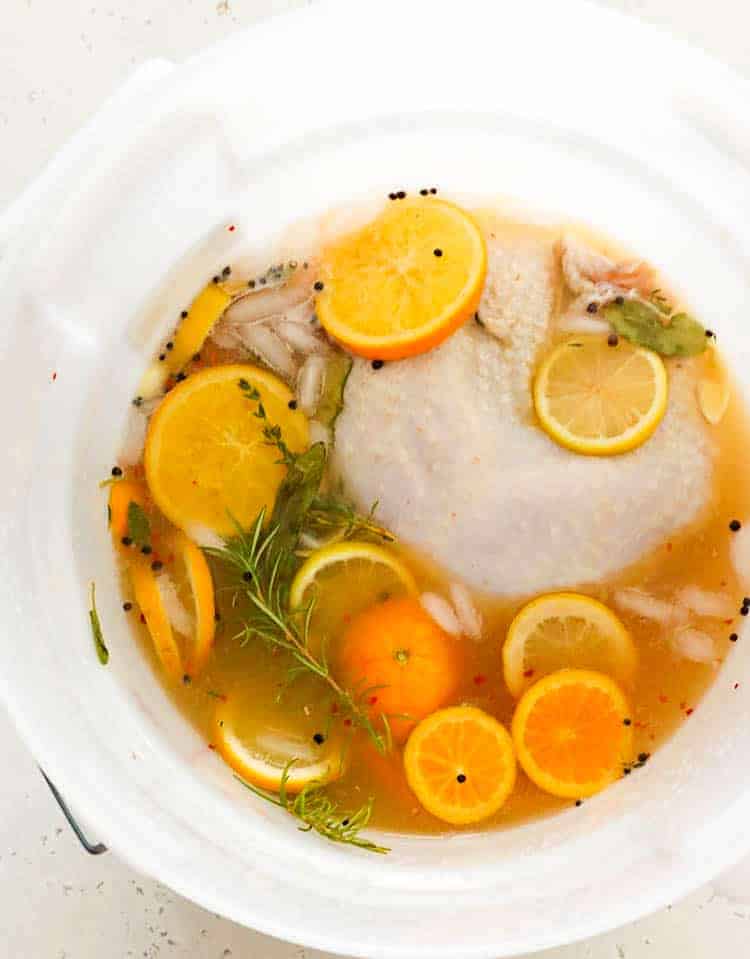
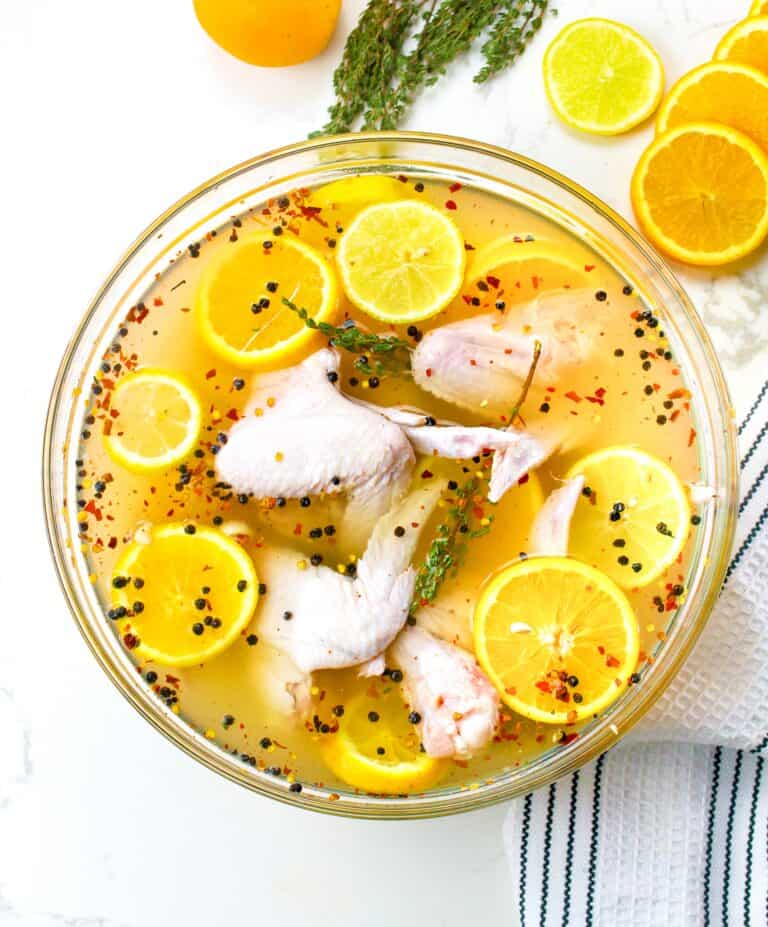
- Seasonings – Pour the brine over the turkey. Then add garlic, thyme, rosemary, sage, bay leaves, peppercorns, pepper flakes, orange, and lemon slices. Give it a stir, and add some ice if you have it. (Photos 3-4)
- Chill – Cover the pot or container with a lid. Place it in the fridge to brine for 12-24 hours. (I had to completely empty two shelves and remove one from my fridge to accommodate the turkey.)
- Cook – Drain your turkey and pat dry. Then, proceed with your chosen turkey recipe.
Recipe Variations
Mixing and matching flavors in a turkey brine is fun!
- Maple Bourbon Brine: Add half a cup each of maple syrup and bourbon to your brine for an exciting twist.
- Ginger Lime Brine: Add 2 tablespoons of freshly grated ginger and a tablespoon of soy sauce, and replace the lemon slices with lime.
Tips and Tricks
- Do not over-brine your turkey! Leaving it in the solution over the recommended time may make it salty and spongy.
- Rule of Thumb: Let the turkey sit for an hour per pound. Remove the turkey from the brine and dry it with paper towels. Brush with oil and proceed with the desired seasoning.
PRO TIP: My favorite way to achieve that irresistible crispy skin is to air-dry the turkey in the fridge for at least 8 hours. I promise it’s all worth the extra wait!
Storage Instructions
I recommend keeping your turkey and the brine in the fridge below 40℉ (4℃). This keeps the turkey and solution cold enough to inhibit bacteria formation. Cover it with cling wrap or tin foil and place it in the fridge. It’s important to remember that brining doesn’t necessarily preserve the turkey, so it’s best kept chilled.
FAQs
It depends on the size of the turkey, but the average is 12-24 hours. The smaller the turkey, the shorter the brining time. Plan on an hour per pound. So, an 18-pound turkey needs 18 hours of brine time.
No! Never use the same turkey brine twice. First, all the flavor will have been absorbed by the first turkey. And second, bacteria from poultry can live a long time. Please don’t risk food poisoning.
A basic brine is salt and water. The average ratio is 1 cup of kosher salt to a gallon of water. To that, you can add more flavor, like bay leaves, garlic, orange slices, rosemary, bourbon, etc.
What to Serve With Your Holiday Turkey
Classic side dishes for this beautiful bird are sweet potato casserole, roasted root vegetables, garlic mashed potatoes and gravy, green bean casserole, and pumpkin pie. I usually add pecan pie just for fun!😍
More Delectable Seasoning Recipes to Try
- Homemade Poultry Seasoning
- Blackened Seasoning
- Creole Seasoning
- Pork Butt Brine
- Jamaican Jerk Seasoning
Conclusion
So there you have a super simple way to make a juicy, tender holiday turkey. How are you going to cook it? Please share your method in the comments because I would love to hear from you. 😍
Watch How to Make It
[adthrive-in-post-video-player video-id=”1Ru5rzMG” upload-date=”2021-09-28T07:00:00.000Z” name=”How to Brine a Turkey” description=”It’s high time you learn How to Brine a Turkey properly for a moist and flavorful Thanksgiving turkey. Let the zingy, herby, and fresh flavors infuse your turkey to the bone while making it super juicy! ” player-type=”collapse” override-embed=”false”]
This blog post was originally published in September 2021 and has been updated with additional tips, new photos, and a video.
How to Brine a Turkey
Ingredients
- 1 gallon water
- 1 gallon apple cider (or replace with water)
- 1½ cups kosher salt
- ½ cup brown sugar
- 7-8 cloves garlic, smashed
- 4 sprigs thyme
- 4 sprigs rosemary
- 4 sage leaves
- 4 bay leaves
- 2 tablespoons cracked peppercorn
- 1-2 tablespoon red pepper flakes
- 2 large orange, sliced
- 2 lemon, sliced
- 1 turkey, 12-17 pounds
Instructions
- Discard any wrappings from the turkey and remove the giblets, place it in the desired brining pot.
- Heat up about 4 cups of water in the microwave or stovetop until warmed. The idea is to heat it up so it can dissolve the sugar and salt. Remove and pour in the salt and sugar. Stir until salt and sugar dissolves.
- Let the salt and sugar brine cool, then add the remaining water and apple cider. The water should not be warm – you want it to be completely cold.
- Pour over the turkey in the pot. Then add garlic, thyme, rosemary, sage. bay leaves, peppercorns, pepper flakes, orange, and lemon slices. Give it a stir, add some ice, if available.
- Cover pot or container with a lid. Place in prepared place in the fridge for the turkey to brine for 12 or up to 24 hours. I completely emptied and remove one divider in my fridge to accommodate the turkey.
- Rule of Thumb: Let the turkey sit for an hour per pound.
- Remove the turkey from the brine and dry all over with paper towels Brush with oil and proceed with the desired seasoning.
Tips & Notes:
- Do not over-brine your turkey! Leaving it in the solution for more than the recommended time may make it too salty and spongy.
- Rule of Thumb: Let the turkey sit for an hour per pound. Remove the turkey from the brine and dry it all over with paper towels. Brush with oil and proceed with the desired seasoning.
- Please keep in mind that the nutritional information is a rough estimate and can vary significantly based on the products used in the recipe.
Hi!
Can I use a a turkey that has been injected with a saline solution?
Thank you
Hi Lisa. If you have a turkey that has already been injected with saline solution, you don’t need to brine it. Hope that helps.
This brine sounds good! I am not a cook, so please forgive me for asking this, the Apple Cider, is it Apple Cider Vinegar or Apple Cider the drink?
Thanking you advance for the clarification for this non-cook:-)
Hi Lisa! No worries! Yes. It’s apple cider the drink.