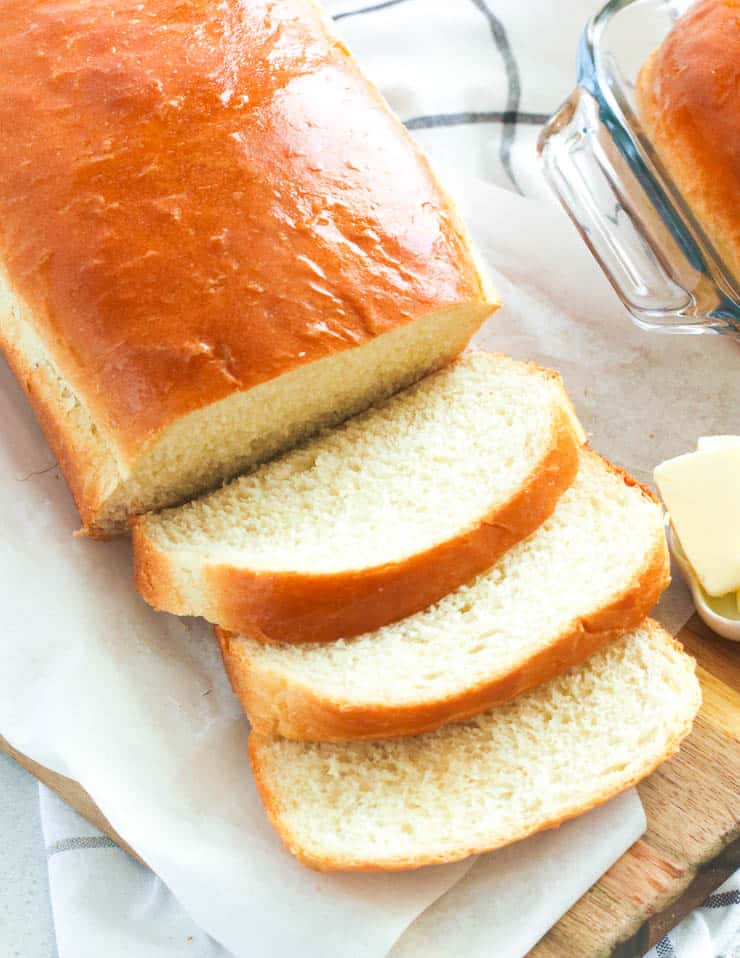
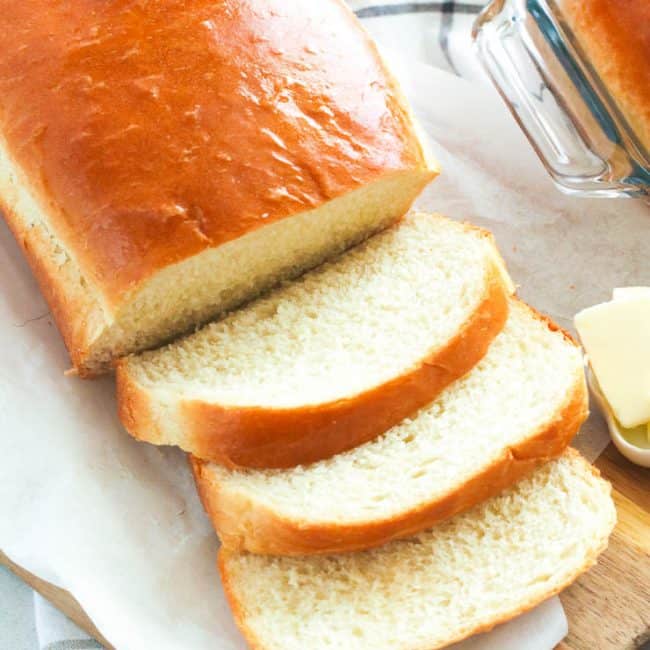
Basic Homemade White Bread
Fluffy, buttery, and super easy basic homemade white bread tastes way better than store-bought. Besides, nothing compares to that freshly baking bread aroma that fills the home.
The beautiful aroma of fresh bread wafting by grabs my attention every time. Whether I’m passing Panera or my local bakery, that intoxicating fragrance unfailingly draws me in. And when I make it at home, I usually devour at least half of the loaf by myself.
The Pandemic was rough on us, and I still deal with the trauma occasionally. Fortunately, cooking and baking were my therapy that kept me sane. Honestly, kneading bread is quite therapeutic.
Why Make Your Own Bread
Every time I’ve mentioned how much I love making bread, someone invariably says it’s too hard. Why? OK, the kneading part can seem challenging. However, it’s as easy as mixing, letting it rise, making it into a loaf, and baking it.
Now, let’s face reality. With the latest concern about the effects of eating ultra-processed foods, bread tops that list. Besides, you miss that addictive aroma that fills the home as it’s baking. Additionally, this basic recipe can be adapted with more flavor. Garlic, cinnamon, herbs, and cranberry orange are flavors that go well with this blank canvas.
How to Make Basic White Bread at Home
Make the Dough
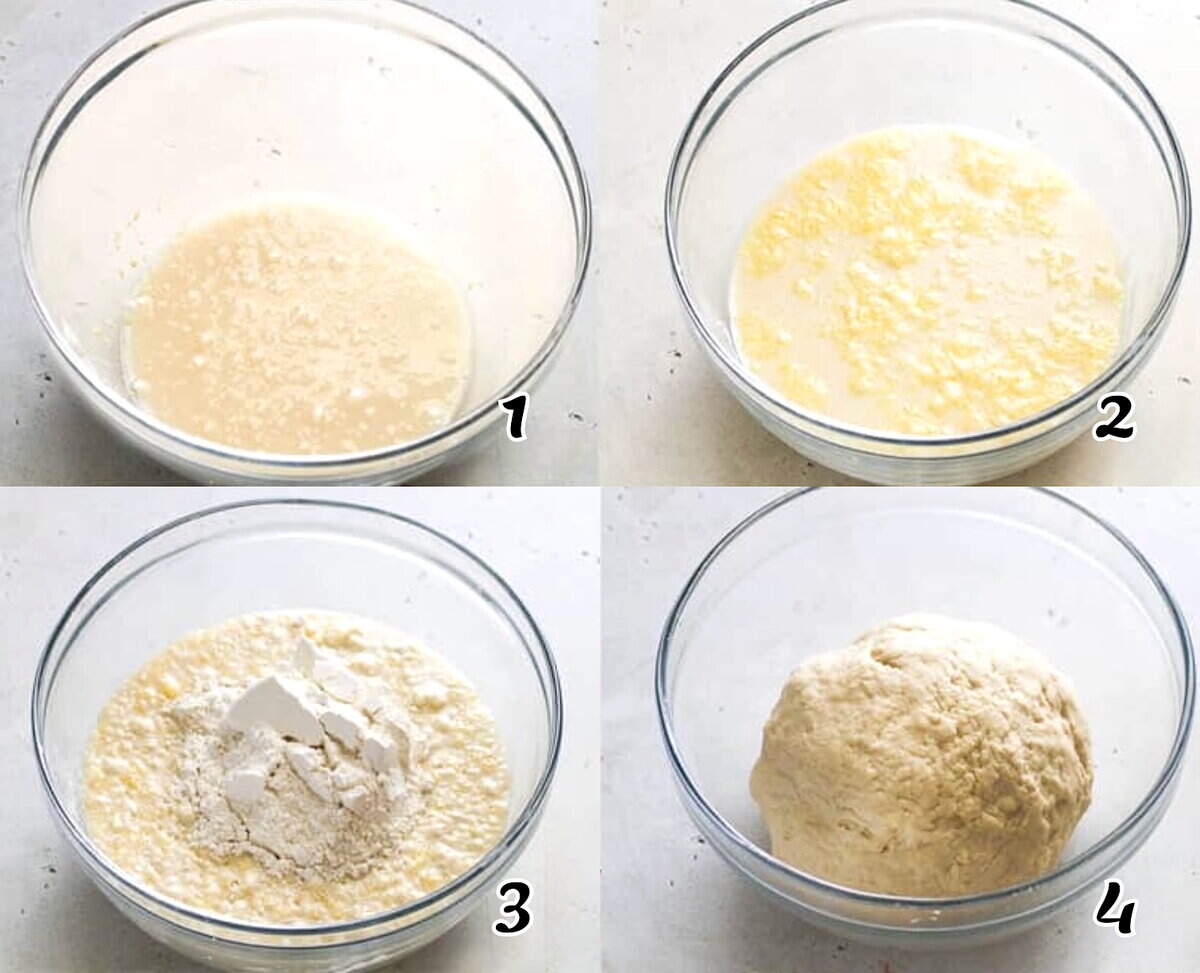
- Activate Yeast – Combine warm water and yeast in the stand mixer bowl and attach the dough hook. (If making it by hand, mix the water and yeast in a large mixing bowl. Let the yeast dissolve for about 5 minutes. (Photo 1)
- Assembly – Pour in the milk, honey, butter, and salt, and stir. Gradually add the flour and continue mixing the dough on low speed, adding just enough flour to form a soft dough. (Photos 2-4)
- Knead – If using a stand mixer, let the dough hook do its job until the dough forms a ball and no longer sticks to the side of the bowl. If mixing by hand, remove the dough and knead it on a lightly floured surface for 6-8 minutes.
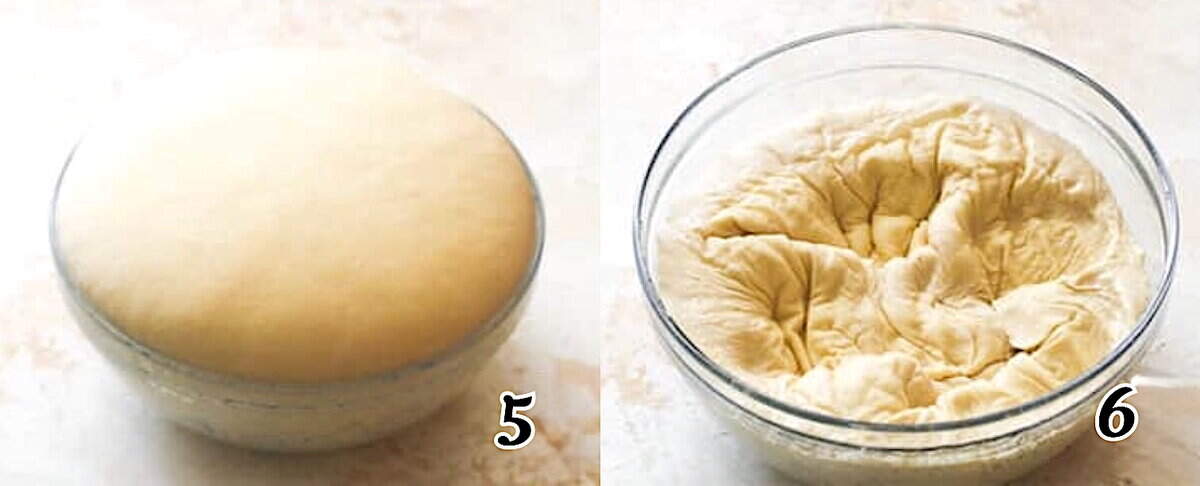
- Rise – Place the dough in a greased bowl, turning once to coat. Cover it loosely with a clean cloth and let rise in a warm place for 1½-2 hours or until doubled. Then punch the dough down. (Photos 5-6)
Form the Loaves
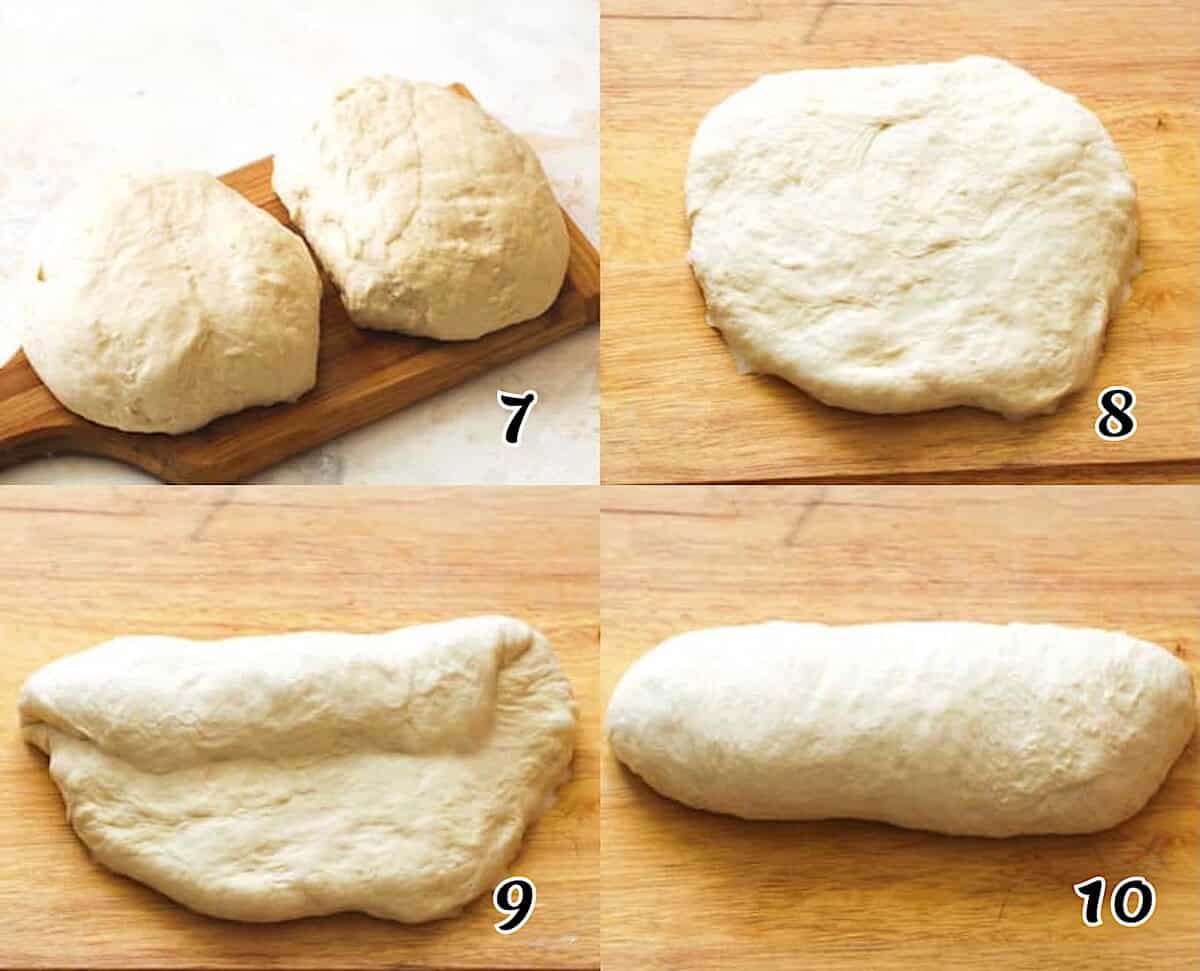
- Form Loaves – Working on a lightly floured surface, divide the dough into two pieces. Flatten one half into a rectangle, then fold a third of the dough on top of itself. Quickly fold the bottom third down so that it overlaps the other layers to form a loaf shape. Pinch the dough to seal it where the layers meet to close it up. Repeat with the second half. (Photos 7-10)
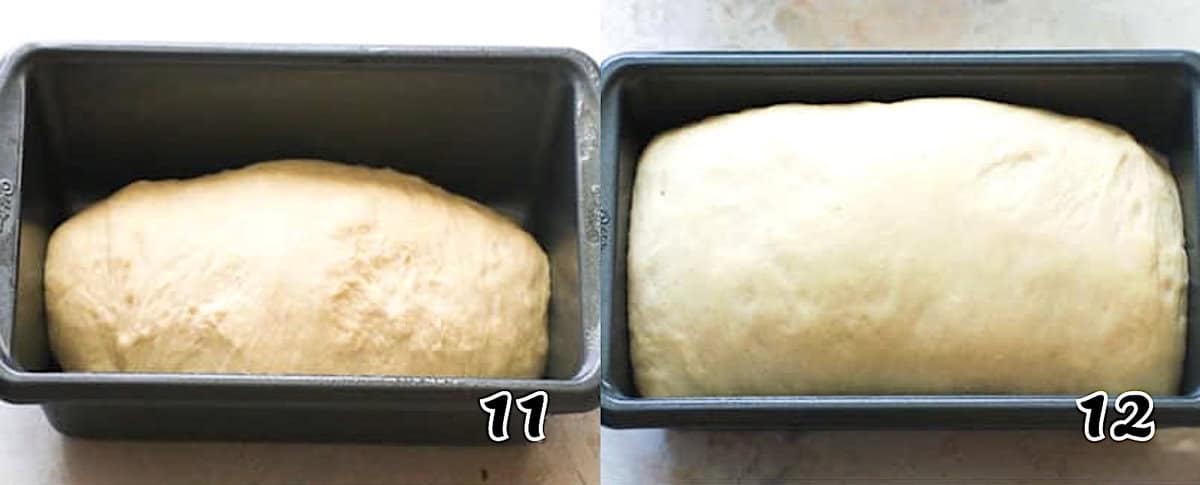
- Second Rise – Lift the loaves and place one each into two greased 9×5-inch loaf pans. Allow them to rise for 30 minutes or until the bread has risen to an inch above the rim of the loaf pans. (Photos 11-12)
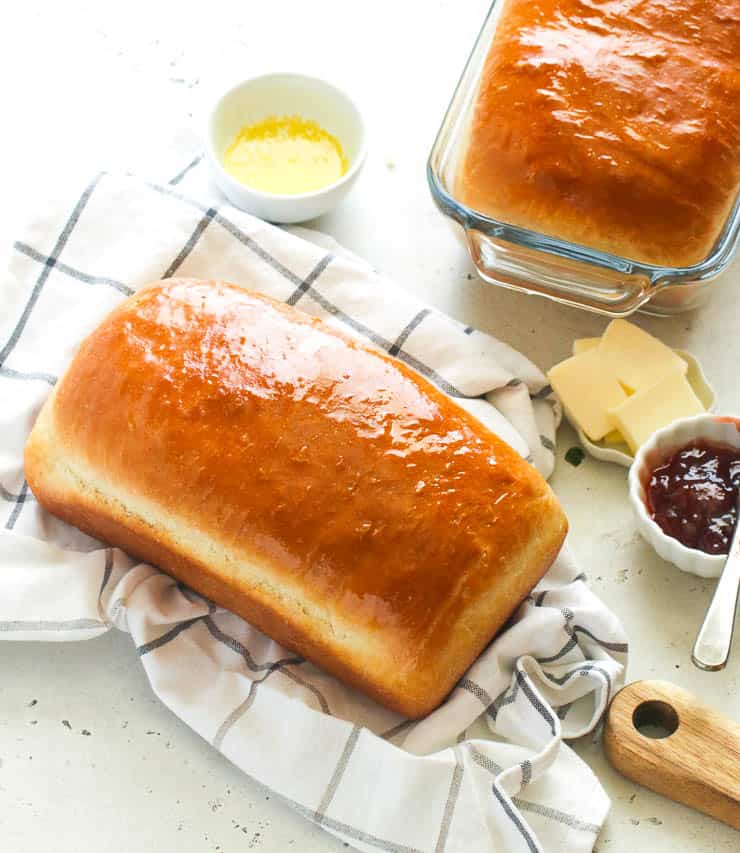
- Bake at 350℉ (175 ℃) for 30-40 minutes. If the bread browns too fast, tent it with foil. Check for doneness with an instant-read thermometer inserted into the center; it should read 195-210°F (90-98 ℃).
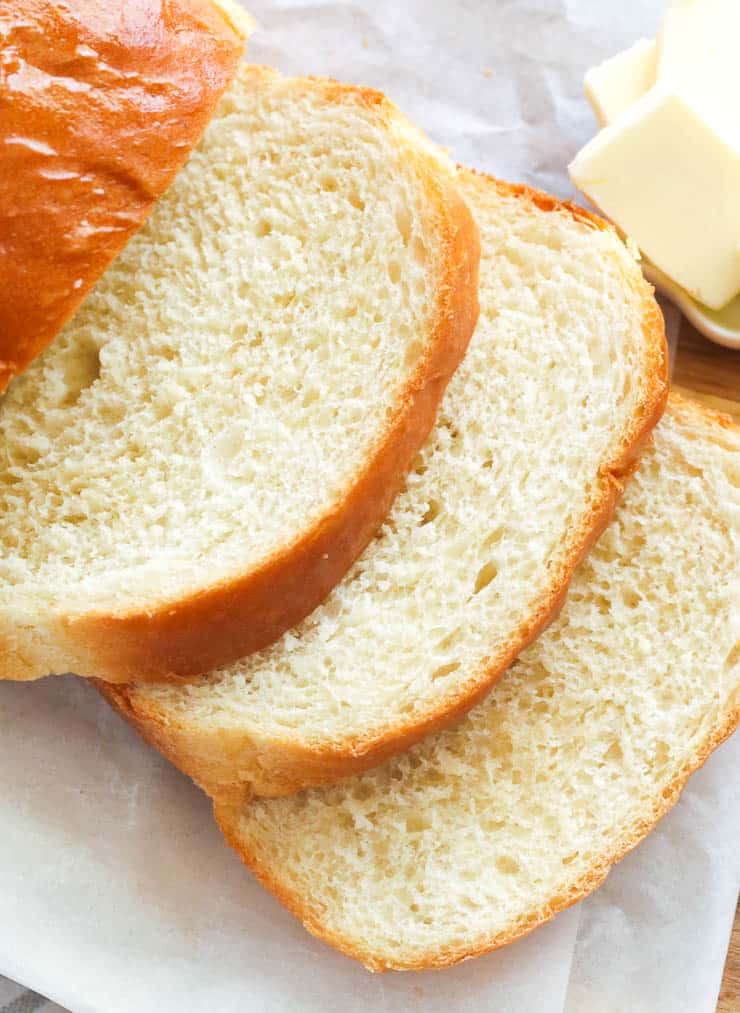
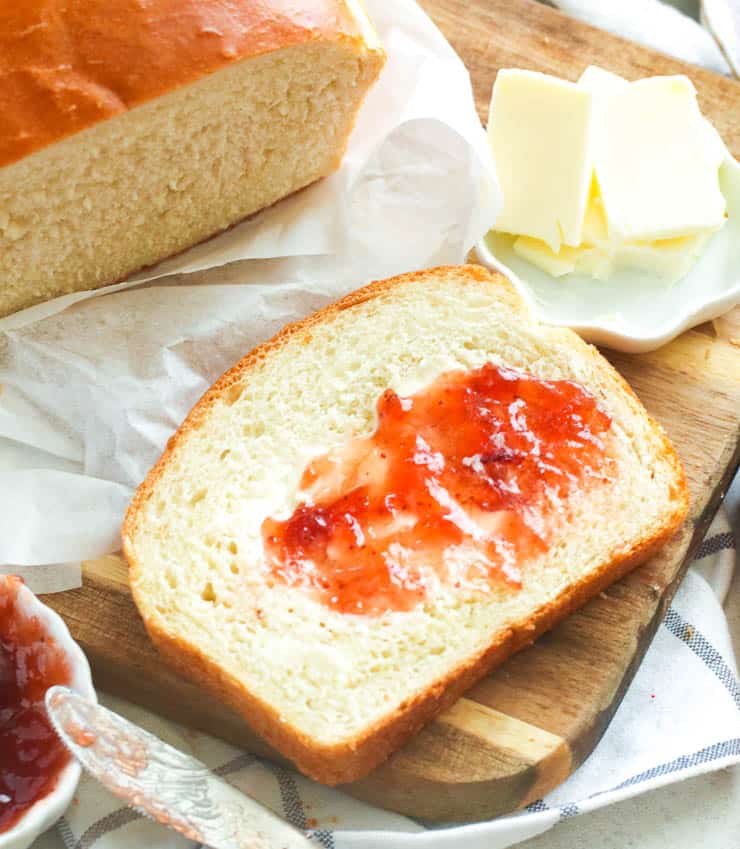
- Brush with butter, allow it to cool, and enjoy!
Recipe Notes and Tips
- Add raisins or dried cranberries with a couple of tablespoons of sugar for a fruity bread.
- Half a cup of dried herbs like rosemary, basil, thyme, oregano, and garlic makes a great savory herbed bread.
- A cup of freshly grated cheese (cheddar, Colby, or Monterey Jack) provides a delicious cheese bread for all you cheese lovers out there.
- Bread flour is the preferred flour for bread due to its high gluten content. However, all-purpose flour will work fine if that’s what you have.
Storage and Leftover Makeovers
Wrap your bread in plastic or foil, and store it at room temperature (60-80℉/15-26 ℃) for 4-6 days. Freezing it is better than keeping it in the fridge if you need it to last longer. It should last 3-4 months if well wrapped.
Fabulous recipes for day-old bread are bread pudding, DIY breadcrumbs, and panzanella salad.
You could also make your own croutons by cutting the bread into cubes. Drizzle them with a little olive oil and sprinkle them with Italian herbs. Toss gently to season the bread cubes evenly.
Spread them out in a single layer on a baking sheet and bake at 350℉ (180 ℃) until golden, stirring once or twice so they brown all sides. Remove from oven, and let cool completely. Use immediately, or store in an air-tight container for up to 1 week.
More Deliciously Sustaining Bread Recipes
Watch How to Make It
[adthrive-in-post-video-player video-id=”d6941M90″ upload-date=”2020-09-28T09:14:09.000Z” name=”Basic Homemade White Bread” description=”Fluffy, soft, buttery, and super easy basic Homemade White Bread with just the right amount of sweetness that tastes way better than store-bought. Get ready to fill your house with that fresh-from-the-oven smell. Go grab the ingredients and bake away!” player-type=”collapse” override-embed=”false”]
This blog post was originally published in March 2020 and has been updated with additional tips, new photos, and a video.
Homemade White Bread
Ingredients
- ½ cup (118ml) warm water
- 2¼ teaspoons (7g) active dry yeast (1 packet)
- 1¾ cups (420ml) milk
- ¼ cup (85g) honey
- ¼ cup (57g) melted butter
- 3 teaspoons (13-15g) salt
- 5½-6 cups (700-762g) bread flour
Instructions
- Combine warm water and yeast in the stand mixer bowl and attach the dough hook. (If making it by hand, mix the water and yeast in a large mixing bowl. Let the yeast dissolve for about 5 minutes.
- Pour in the milk, honey, butter, and salt, and stir. Gradually add the flour and continue mixing the dough on low speed, adding just enough flour to form a soft dough.
- If using a stand mixer, let the dough hook do its job until the dough forms a ball and no longer sticks to the side of the bowl. If mixing by hand, remove the dough and knead it on a lightly floured surface for 6-8 minutes.
- Place the dough in a greased bowl, turning once to coat. Cover it loosely with a clean cloth and let rise in a warm place for 1½-2 hours or until doubled. Then punch the dough down.
- Working on a lightly floured surface, divide the dough into two pieces. Flatten one half into a rectangle, then fold a third of the dough on top of itself. Quickly fold the bottom third down so that it overlaps the other layers to form a loaf shape. Pinch the dough to seal it where the layers meet to close it up. Repeat with the second half.
- Lift the loaves and place one each into two greased 9×5-inch loaf pans. Allow them to rise for 30 minutes or until the bread has risen to an inch above the rim of the loaf pans.
- Bake at 350℉ (175 ℃) for 30-40 minutes. If the bread browns too fast, tent it with foil. Check for doneness with an instant-read thermometer inserted into the center; it should read 195-210°F (90-98 ℃).
- Brush the loaves with butter, allow them to cool, slice, and enjoy!
Tips & Notes:
- I used bread flour, but all-purpose will work with very little difference.
- Please remember that nutritional information is a rough estimate and can vary greatly based on the ingredients used.

Hi!
Love this recipe.
At what point do you add the raisins/cheese:herbs etc!?
Hello,
The mixing part. After you add the flour .
I’ve made this recipe twice a week for the last three weeks. It’s such a great recipe. Bread comes out great each time. Thank you so much for giving me a back my love for baking bread.
The pleasure is mine too, Nicole. :). I am so thrilled you love it. Carry on baking!
Hi,
Is the butter melted or added in the whole form?
Thanks
Melted butter 🙂
Thank you so much,I follow you recipe but I have a little problem.
Pls how can I get rid of the yeast smell ?
Thank you
Try kneading the dough a little longer. That might help a little.
Hi ima my name is Jane I just joined your baking program and I am so happy to be here keep it up
Glad to have you here Jane :)!
Hi imma eversince i came across your blog I’ve been very inspired by your recipes .keep it up girl thank you so much
Thank you too, Angie :)!
Thanks for the post,
What quantity of sugar can be used to substitute the honey.
Thanks
Hi Tutu,
Sub with 4 Tablespoons sugar. Enjoy!
Thank’s siz I’m going to try it
Hi Imma,
I tried the banana cake recipe and it was an instant hit also the plantain pancakes and the yellow vanilla cake. I must say my family and I are officially hooked on your recipes. Can’t wait to try this bread recipe for breakfast tomorrow.
Thank you so much! I’m so happy to read your comment. So excited for you to try this. Enjoy!
I am an ardent follower of yours. Thanks for all the recipes you share. You are simply awesome. Thanks Imma
The pleasure is mine too :). Thank you for the kind words.
5 star!! This is the best bread recipe I have tried. So soft and yummy.
Awesome! Thanks so much.
Hi can I leave out the honey will I get the same outcome
You will get the same texture but the taste will vary. Replace with sugar , if possible.
I made this bread shortly after you posted the recipe. I was a little intimidated, but I did it! And, big bonus, my family loved it!
YAY! So happy to hear to hear that.
Hi Imma. Love your recipes. Can I replace the butter with olive oil or lard? Thank you.
Hi. Yes, you can. Enjoy!
A very good STAY-AT-HOME Work…I gonna try it tomorrow and if I succeed I’ll adopt it forever.
My eaters have been equesting for brioche and white bread…
Thanks a lot
Hi,
Please can I use all purpose flour in the absence of bread flour?
Hello,
Yes you can.
Hi, I have 2 questions…can I use fast rising yeast?
Can I use regular all purpose flour?
Yes you can to both questions.
Not having honey on hand, I used LA cane syrup. Yummy with a slight twist. No bread flour in this small community so just plain good white flour. I’ve been making bread for many yrs since I was a preteen and done every day. This is a good recipe. Will try it again with whole wheat flour and the cane syrup & a little brown sugar. Should be good then too. Thanks for your recipe; have compared it with my usual one and they are comparable.
This is the first time I’ve posted this; and the first time I’ve seen the recipe. No duplication as your site seems to suspect.
I am doing a version with Wheat flour for my healthier audience. How did yours turn out? Enjoy
Hi.
My name is Bernie.
I have 2 questions for you.
1.
Can I use the same recipe for my bread baking machine?
2.
Can I halve the ingredients so that I can use the bread machine. We are only 2 people that will be eating the bread.
Kind regards
Bernie.
Hello Bernie,
Yes you can cut the recipe in half . Am not too sure about making it in a bread machine because I have no experience working with bread machine- sorry.
Bernie I use bread machine on this to save kneading time and works great I suggest baking in the oven though it turns out better
Thanks for sharing Brent. This will definitely help a lot of other readers.
Nice
Thank you so much, it’s long I have been looking for a platform where I can learn how to bake break myself, this platform has really taught me what I’ve been dying to learn. God bless you.
So happy to I could be of help. Thanks for giving it a try. God bless and be safe!
Can I replace regular white flour with Wheat Flour? If so, does the amount of liquids changes too? Please advise. Thank you, Bobie
Hi Bobie,
I would suggest only replacing half of flour with whole wheat flour . And add about 1/4 cup additional milk.
Hope this helps
Hi Imma, I’m wondering if you can share a wholemeal bread recipe too, as it’s my favourite. Thank you so much!
Hi Lyn! I have tried making bread with 100% whole wheat flour and really didn’t like it at all . What I do is replace half of the flour with wheat flour and it works out well. I have a whole wheat bread roll recipe will update it and repost soon.
Plz how did the top of the bread brown? I’m new here and I have tried baking a simple cake but it didn’t brown at all .
Hello Jennifer! The browning happens with baking bread, it has something to do with the ingredients and of course, the heat of your oven. 🙂 Hope this helps!