Southern Fried Chicken
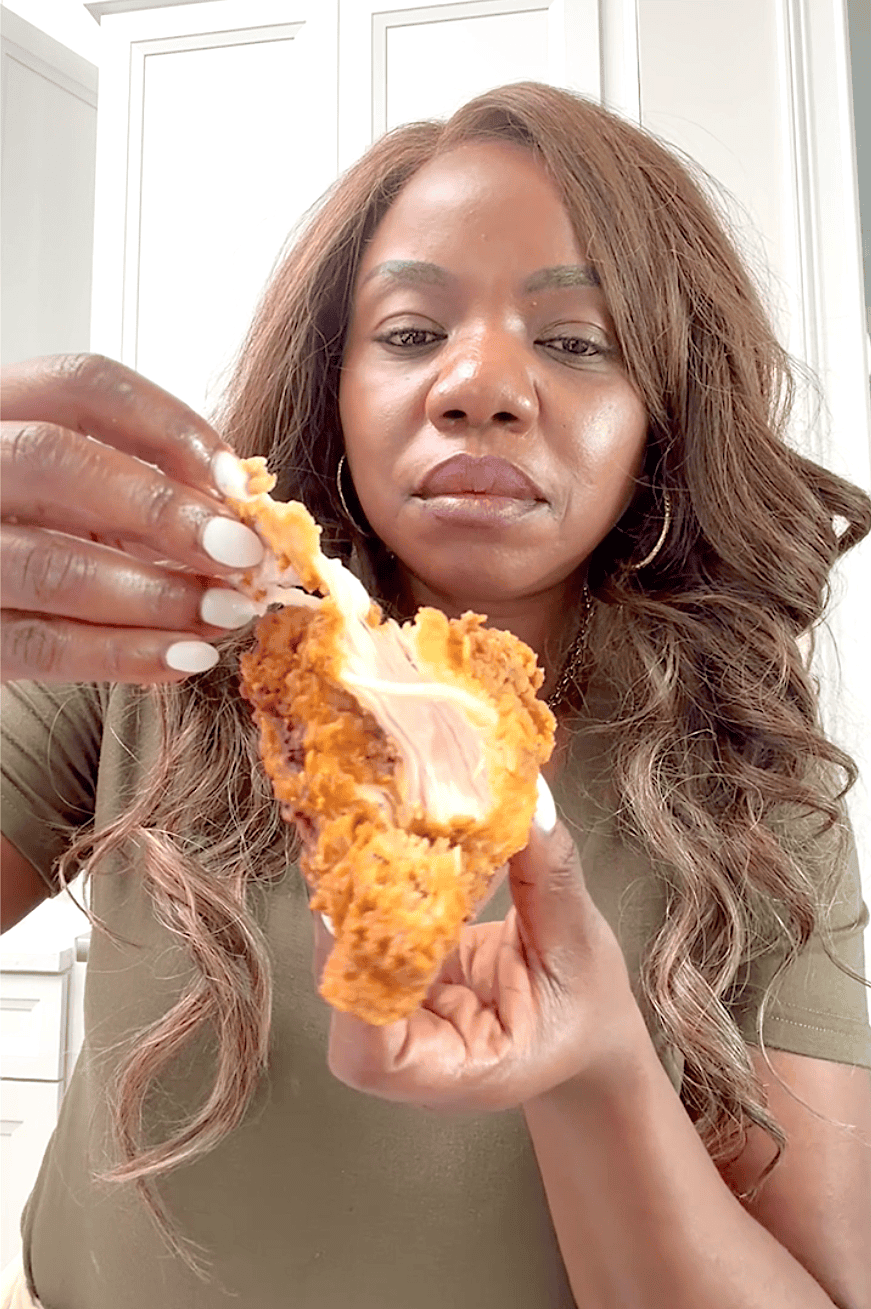
There’s nothing like having a good Southern fried chicken recipe in your collection. One bite of this chicken’s crunchy, spicy outer layer, followed by the tender, juicy meat inside, and you’ll understand why it’s a true-blue Southern classic. Infused with spices for intense flavor and marinated in buttermilk to make it juicy, it’s the perfect main course for your next picnic!
I’ll never forget that day my son was craving fried chicken, but I did NOT want to leave the house. I dug into my archives and realized I already had everything I needed. After devouring half a chicken, the love of my life declared that it was better than anything he had eaten in a restaurant.
Besides being pure deliciousness, this Southern fried chicken recipe is a must-have at any cookout. The secret to tender, juicy chicken is marinating it in buttermilk. The seasoned breading delivers a crispy outer coating for a dish that tastes like a million bucks but costs only a few dollars.
The Secret to Perfect Fried Chicken
Perfectly fried chicken is tender and juicy on the inside and crispy on the outside. A few tricks will bring that about.
- Marinating it in buttermilk adds a tang and tenderizes the meat.
- Be generous with the seasonings, both in the marinade and the breading.
- Don’t forget the baking powder to create bubbles and encourage crispiness.
- Let the chicken rest for about 10 minutes after breading it so it firms up and sticks better when you fry the chicken.
- Make sure the temperature of your oil doesn’t go below 350℉ (180℃). The temperature will drop slightly when you add the raw chicken, so heat it to 375℉ (190℃) before you start.
- Add a few slices of onion to the oil to check the temperature and infuse it with more flavor.
- Drain the chicken on a wire rack so it’s not sitting in oil or sticking to a paper towel.
How to Make Southern Fried Chicken
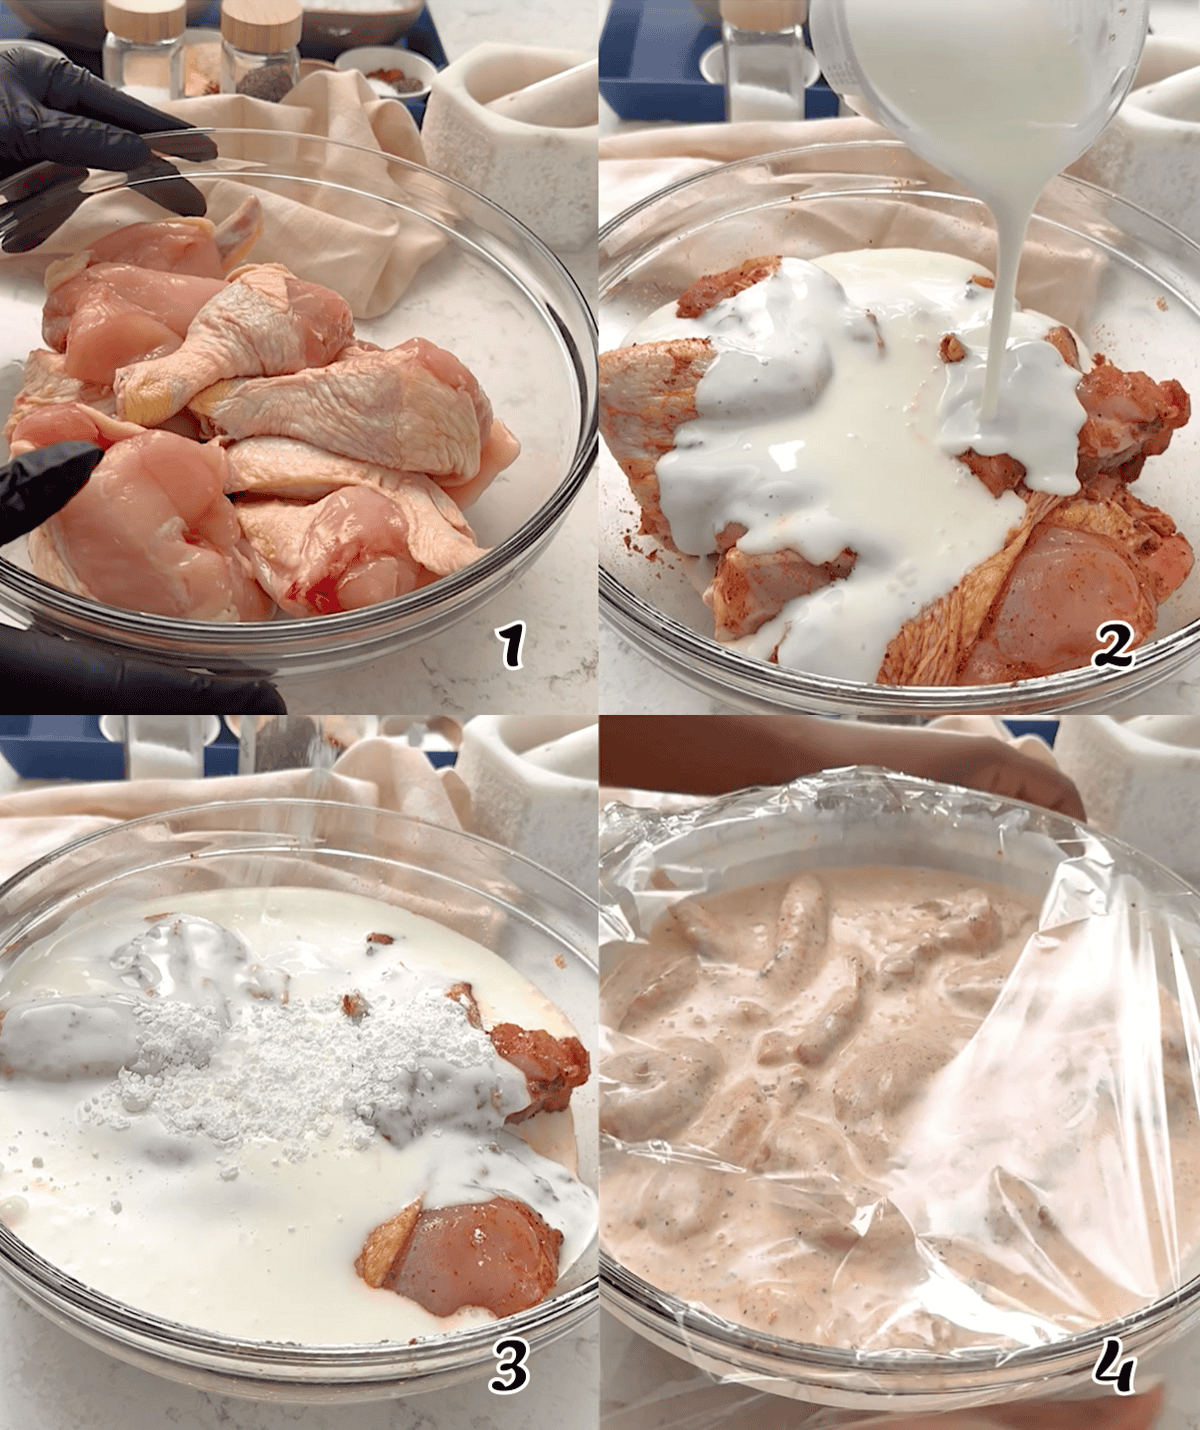
- Season the chicken with salt, crushed garlic, hot sauce, and Creole seasoning. Add the buttermilk and coat the chicken well. (Photos 1-3)
- Marinate it in the refrigerator for at least 4 hours (or overnight). (Photo 4)
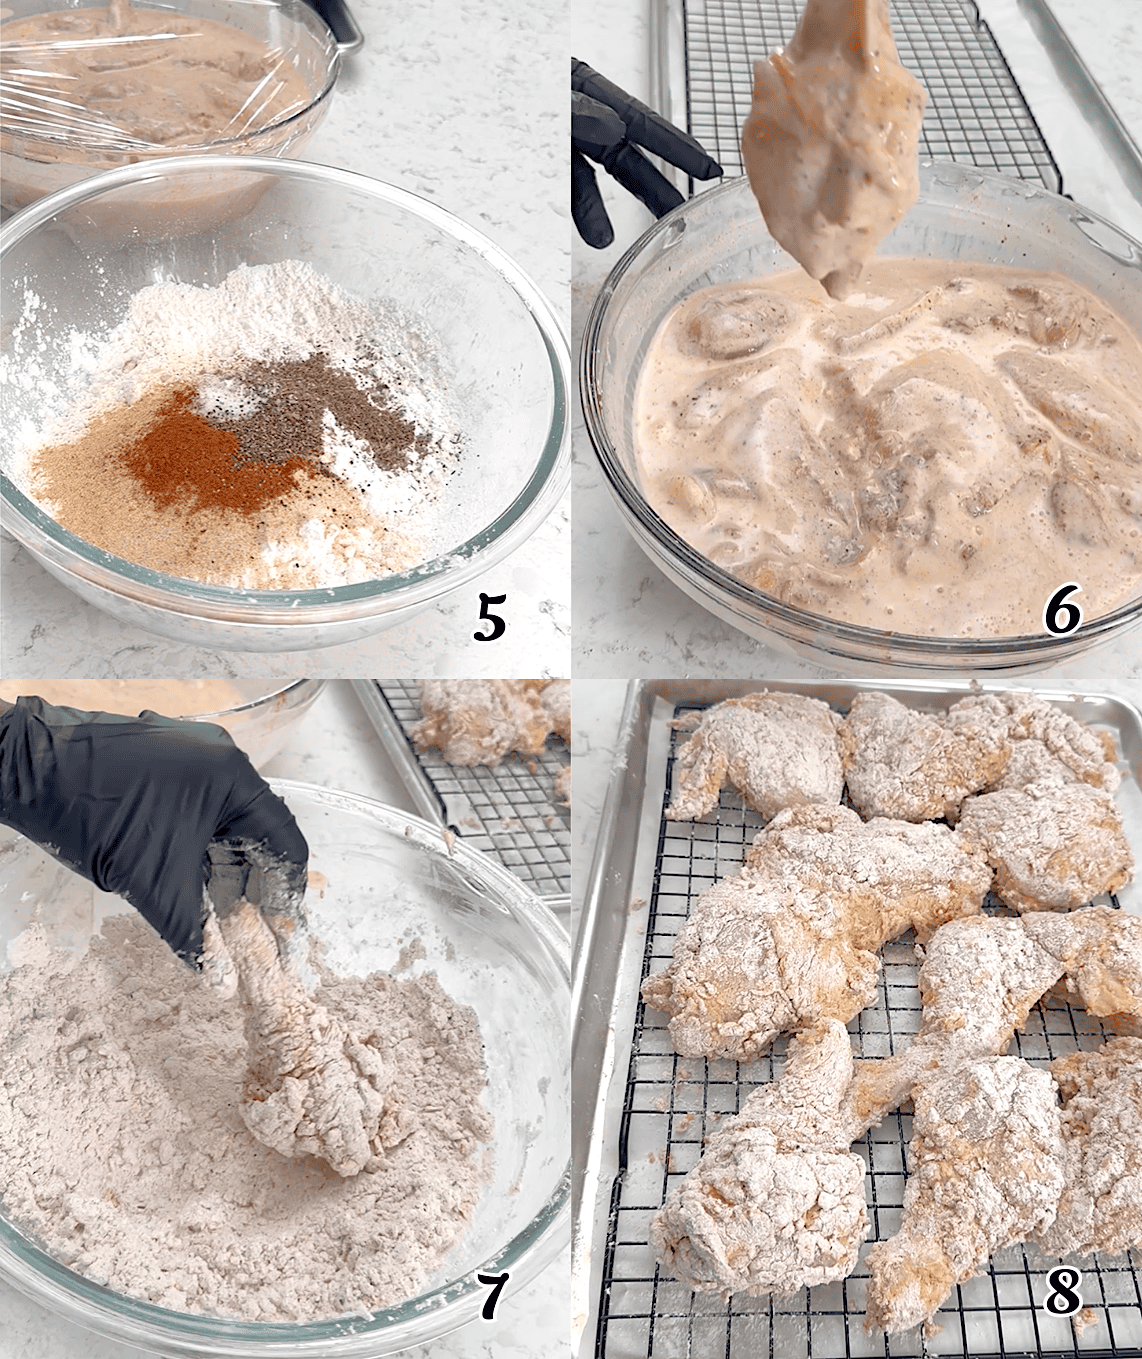
- Whisk the flour, cornstarch, baking powder, paprika, garlic powder, onion powder, herbs, cayenne pepper, white pepper, and salt in a large bowl. (Photo 5)
- Dredge the chicken in the flour mixture, after letting the excess marinade drip off. Then double-coat it by dipping with the remaining buttermilk (add fresh buttermilk as needed) and flour mixture, shaking off the excess. (Photos 6-7)
- Let the chicken rest for 10-15 minutes while heating the oil. That will help the coating to stay on better. (Photo 8)
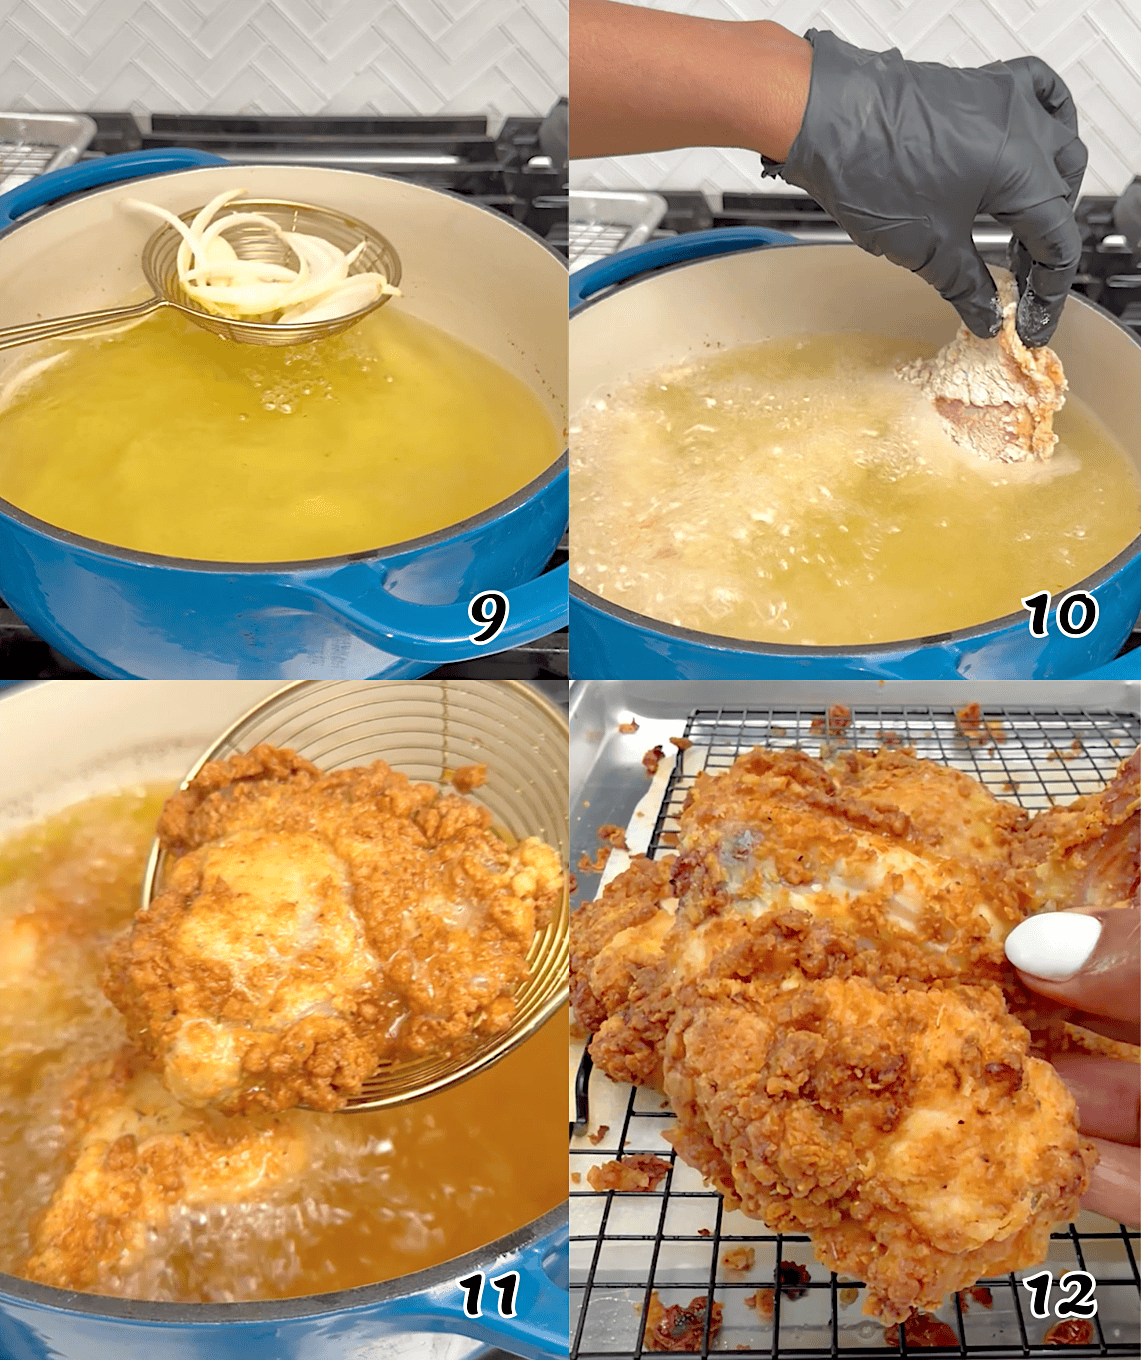
- Heat oil in a deep fryer or cast-iron skillet to 375℉ (190℃). The temperature will drop once you add chicken. Adding a few slices of onion will add flavor and is a great way to test the oil’s temperature. (Photo 9)
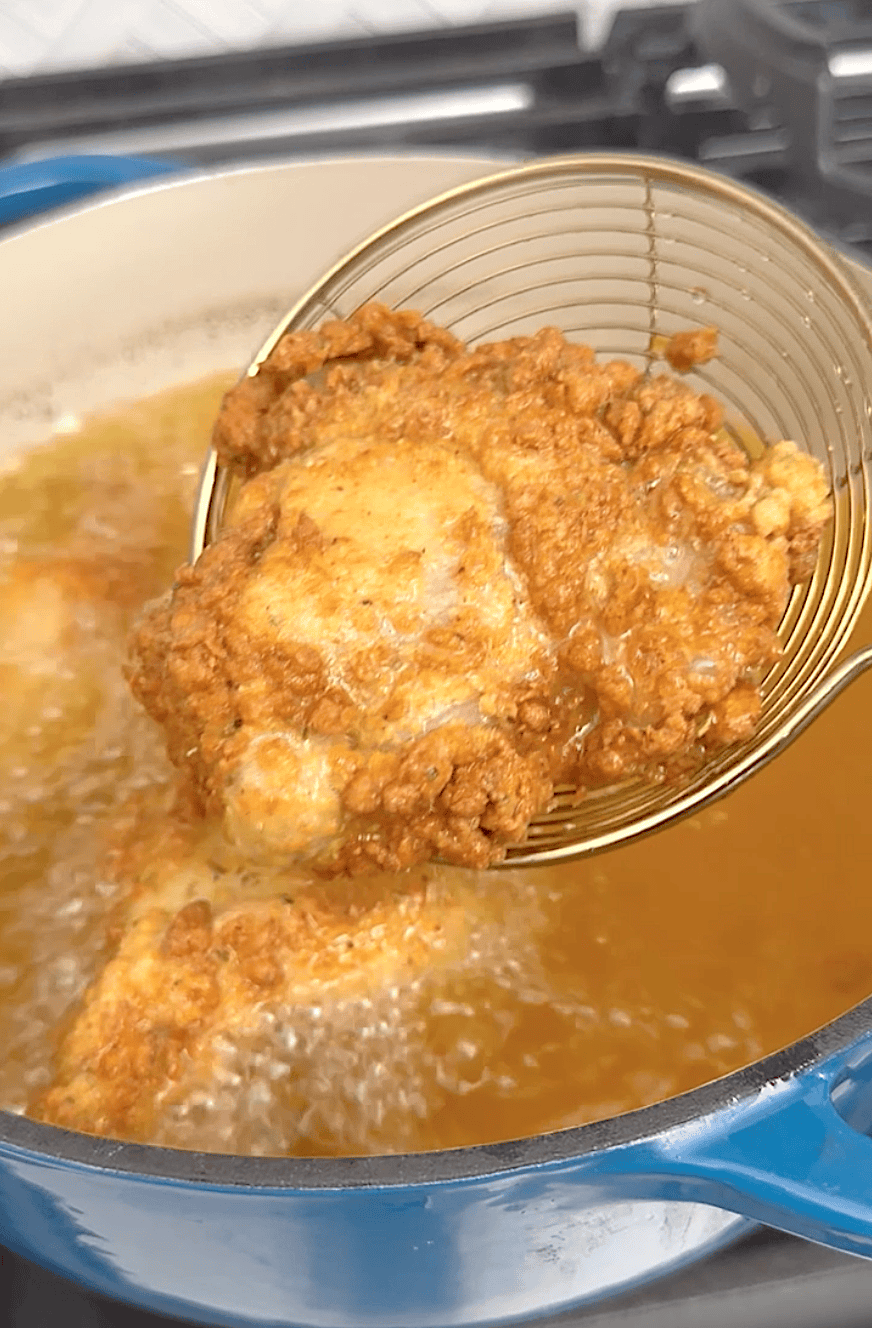
- Fry the chicken, working in batches to avoid overcrowding the skillet, until golden brown, turning once every 10-15 minutes, depending on the thickness of the pieces. An instant-read thermometer will read 165℉ (75℃). (Photos 10-11)
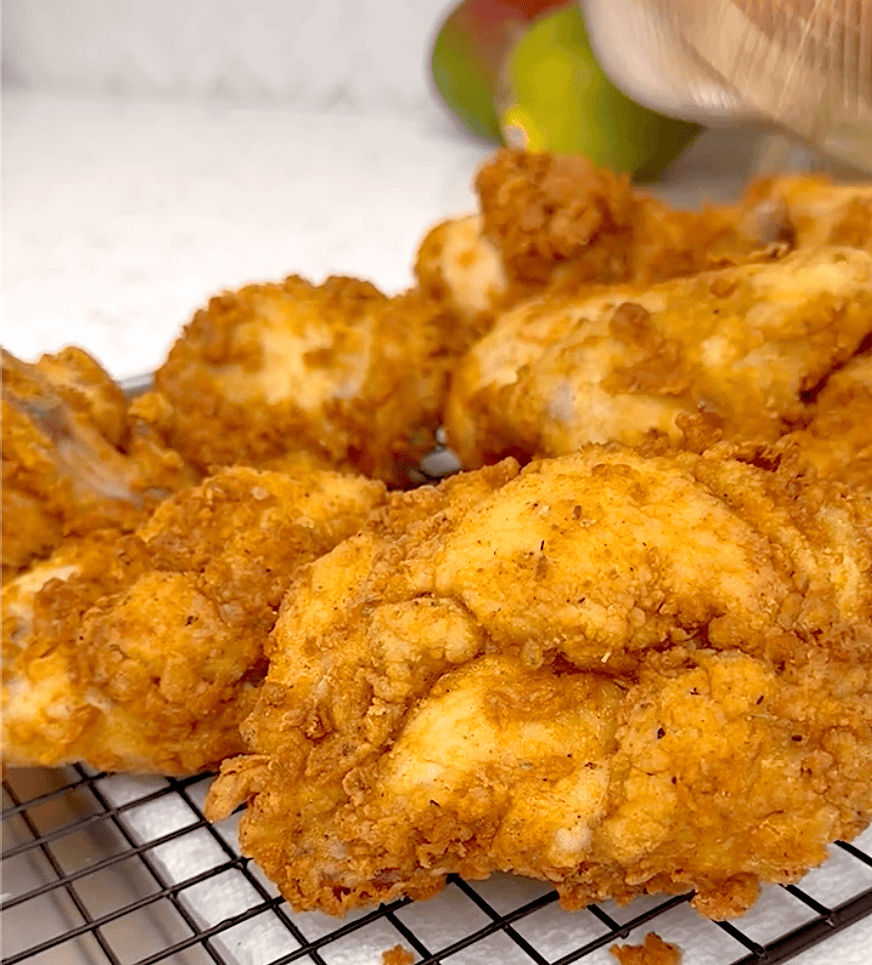
- Drain the chicken on a rack and let it rest for about 10 minutes before digging in. (Photo 12)
Recipe Tips
- Use chicken breast tenderloins instead of a whole chicken to make fried chicken tenders instead of regular bone-in chicken. The kids love these, and they cook faster.
- Neutral-tasting oils with a high smoke point, like canola, vegetable, or peanut oil, are good choices for deep frying.
- This recipe works great in the air fryer. Spritz the breaded chicken with canola oil, crank up your air fryer to 400℉ (205℃), and fry away.
- While I used a whole chicken for this recipe, feel free to use thighs or leg quarters because dark meat stays juicier than the breast.
Storage and Leftover Makeovers
Store leftover fried chicken in airtight containers in the fridge for 3-5 days or the freezer for 2-3 months. Remove it from the refrigerator, let it come to room temperature, and bake it in a 400℉ (205℃) oven on a wire rack over a baking sheet for 15-20 minutes or until it’s heated through and gets its crunch back.
I make extra so we can repurpose the leftovers in a salad, cream of chicken soup, fried rice, quesadillas, and quick chicken sandwiches.
What Goes With Southern Fried Chicken
Um, just all of my favorite sides! For a classic Southern dinner, serve this chicken with collard greens, macaroni and cheese, and homemade butter biscuits.
Make sure you have some Southern drinks and desserts on hand, too. Sweet iced tea is a must. Finish off your meal with a healthy portion of apple cobbler or sweet potato pie, and don’t forget to scoop a dollop of vanilla ice cream on top.
More Classic Southern Recipes to Try
Watch How to Make It
\[adthrive-in-post-video-player video-id=”ZoqhisJ9″ upload-date=”Tue Aug 07 2018 11:39:31 GMT+0000 (Coordinated Universal Time)” name=”Southern Fried Chicken” description=”Southern Fried Chicken – classic Southern chicken recipe that is crunchy and crusty on the outside and juicy and flavorful on the inside; infused with spices and seasonings and soaked in buttermilk to amp its flavor. A great addition to your chicken recipe collection!”]
This blog post was originally published in September 2017 and has been updated with additional tips, new photos, and a video.
Southern Fried Chicken
Ingredients
The Chicken
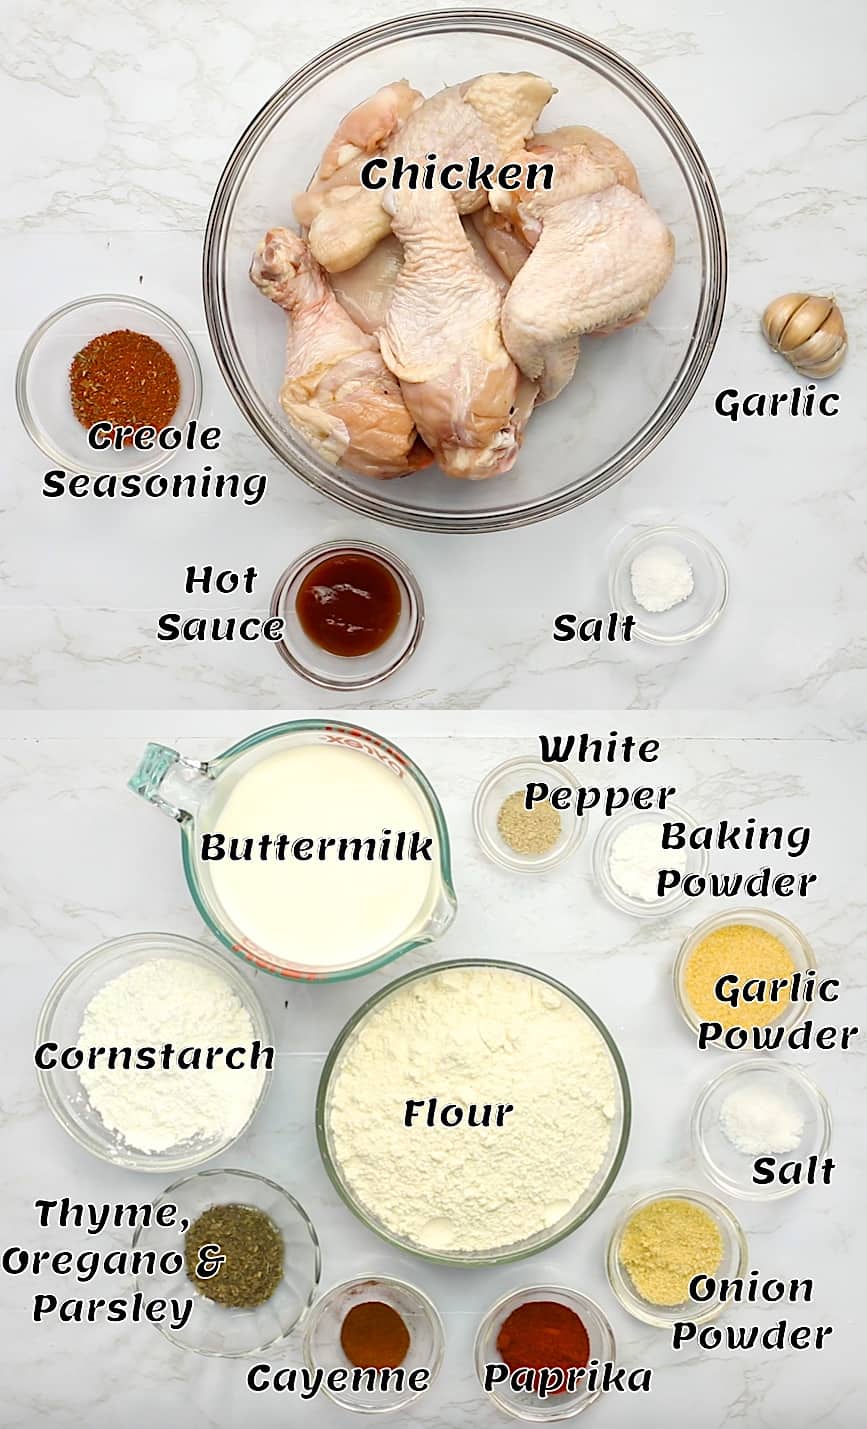
- 1 whole chicken, cut into 10 pieces
- 1½-2 teaspoons (8-12g) salt (adjust to preference)
- ½-1 tablespoon (7-15g) hot sauce
- 3-4 cloves garlic, crushed
- 2-3 teaspoons (8-12g) Creole seasoning
- 4 cups (950ml) buttermilk (for both marinating and coating)
- ¼ cup cornstarch (optional)
Chicken Breading
- 3 cups (360g) all-purpose flour
- 1 cup (128g) cornstarch
- 2 teaspoons (10g) baking powder
- 1 tablespoon (8-9g) paprika
- 2 tablespoons (30g) garlic powder
- 2 tablespoons (20g) onion powder
- 1-1½ tablespoons (5-8g) dried herbs (thyme, oregano, parsley, etc.)
- 1 teaspoon (2-3g) cayenne pepper (adjust to preference)
- 1 teaspoon (2-3g) white pepper
- 1 teaspoon (6g) salt (adjust to taste)
- frying oil
Instructions
- Place the chicken pieces in a large bowl and season them with salt, crushed garlic, hot sauce, and Creole seasoning.
- Pour some of the buttermilk over the seasoned chicken (add optional cornstarch), transfer it to a large bowl or gallon-sized ziplock freezer bag, and marinate it covered in the refrigerator for at least 4 hours (or overnight).
- Whisk the flour, cornstarch, baking powder, paprika, garlic powder, onion powder, herbs, cayenne pepper, white pepper, and salt in another large bowl.
- Remove the marinated chicken from the buttermilk and let the excess buttermilk drain back into the bowl.
- Then, dredge it in the flour mixture, shaking off excess flour. You could use a ziplock bag for this process, too.
- Optional step: Double-dip the chicken in the remaining buttermilk (add fresh buttermilk as needed), then repeat with the flour mixture, shaking off the excess. Let the chicken rest for 10-15 minutes while heating the oil. That will help the coating to stay on better.
- Heat oil in a deep fryer or cast-iron skillet to 375℉ (190℃). The temperature will drop once you add chicken. Optionally, fry a few pieces of onion in the oil to test the temperature and infuse more flavor.
- Slowly and carefully place the chicken in the hot oil using tongs. Work in batches to avoid overcrowding the skillet.
- Fry the chicken until golden brown, turning once every 10-15 minutes, depending on the thickness of the pieces. Chicken is done when it is no longer pink inside, and its juices run clear, or your instant-read thermometer reads 165℉ (75℃). You could do a test by piercing the chicken with a fork.
- Drain the chicken on a rack over a baking sheet, dab with paper towels to remove excess oil if necessary.
- Repeat with the remaining chicken pieces. Let them rest for at least 10 minutes before serving.
Tips & Notes:
- Sometimes I add cornstarch to the marinade, and sometimes I don’t. Try it both ways, and see which one you like best.
- If you want thicker, crispier breading, double-dip it in the buttermilk and flour. If you prefer a thinner breading, just drain off excess marinade and coat it well in the breading once.
- A neutral-tasting, high smoke point oil, like canola, vegetable, or peanut oil, works well. Olive oil does not.
- Avoid overcrowding the pan because it will lower the oil’s temperature too quickly, resulting in greasy chicken.
- A cast-iron pan or deep fryer holds the temperature better and heats evenly.
- Rather than using enough oil to submerge the entire chicken, put enough to submerge ¾ of it. The weight of the chicken will cause it to sit just above the oil’s surface, creating a crispy crust without burning.
- If anything fried sits on a paper towel too long, it may stick to it. Instead, drain your chicken on a wire rack over a baking sheet, and it will stay crispy and dry.
- Please note that the nutritional data is a rough estimate and can vary greatly depending on the ingredients used.
I do not do milk and is looking for a substitute for the buttermilk….any suggestions
Pickle brine! I usually make a small batch and combine it with whatever liquid is leftover from the jar of pickles in my refrigerator. The vinegars and salt denature the proteins pretty efficiently so ideal brining time would be 3-5 hours otherwise it may be broken down too much (. I first tried it this way after learning Chik-Fil-A uses the same process haha, it is pretty good in my opinion. Hope that helped!
Hello, I found your site this morning, and was wondering about the pickle brine method. You brine the chicken in pickle juice 3-5 hours, and when brine is done, do you double dip back into the pickle brine? Please explain, thank you. My daughter has a milk allergy, so this sounds like a great twist.
Does she have allergy for cheese too?If she’s allergic only to raw or pasteurised milk she won’t b allergic to buttermilk which is used only to marinate the meet and for creating the crust and then subsequently fried.Frying in this temperature breaks down all possible enzymes that make her allergic.
Greek yoghurt would work wonderfully
Thank you for such a great recipe. Fried chicken has been one of my favorites since I was little but I have never been brave enough to try to make it myself. Tried it last night, toned down the spice for the kids, and everyone loved it. First time I’ve ever seen them lick their fingers. The skin was darker than my wife prefers so I’ll try with a lower temp next time. Thank you so much for helping me realize a life long dream of making amazing fried chicken.
Hello, I’m going to try your recipe this weekend. It looks good. I have one question. Could I just get the legs and thighs chicken pack or does it have to be a whole chicken?
Yes, you can get the packaged meat parts. That’d be fine.
OK, yes, this is probably the best fried chicken recipe you will find. The taste is incomparable and the texture of the meat is moist, flavorful and utterly addictive. There is only one issue with the recipe as written: The oil should be at 375° when the chicken pieces are immersed in the hot oil, however once the oil cools to around 325° it needs to be kept there so that the coating won’t darken while the meat cooks. I use an electronically-controlled deep fat fryer that I kept at the higher temp so my first batch was dark. While I didn’t care for coating of the darker batch, subsequent batches were perfect. This is my go-to recipe for chicken and I will love having it 2-3x/year with a toast to you, ImmactulateBites…cheers madam, and thank you for sharing this.
Thanks for sharing your thoughts, Darren. Glad you love this recipe. It’s one of my fave, too. Happy weekend! 🙂
The real question is, do you have a husband?
Yes, I do Lewi. Happy New year!!!
Hi,
I made this tonight for our evening meal. It was absolutely delicious. Thank you. We’ll definitely be having it again.
Delicious! The fried chicken turned out perfectly crispy and very tasty. Thank You for sharing this.
You’re welcome, Samara. Thank you for taking the time to let me know.
Oh my gosh, just amazing recipe, Im from Italy and some ingredients are difficult to find, but the result was really awasome. Thank YOU very much
Amazing! Thank you for trying it out and going all in. I appreciate it. =)
Made this for dinner. Oh my. So darn delicious. This is best fried chicken recipe.
Virtual high five, Ann!! Glad you like it.
I tried it it’s very good tasty and amazing
Thanks
Thank you,Matka!
SORRY! I meant to say Baking POWDER. Totally my fault. Why is baking POWDER used? Thanks!
Beth
Baking powder reacts with the skin, and slightly crisp the skin by drawing out moisture .
Imma Do you have a page I can follow? This recipe looks so delicious I am making it for dinner tonight. I dont have time to marinade as it is already 4:30pm. But I will be prepared to do so next time.
Thanks, Mark
Hi Mark, do you mean Instagram ? And how did your fried chicken turn out ?
So 10 to 20 minutes per side. What’s the average total cookie time please.
Cooking time total should be about 10-12 minutes or even more depending on the size of chicken.
What an amazing recipe. The fried chicken was so delicious and flavorful. I loved the spices. It reminded me of my Georgia-raised Mom’s cooking. The only issue I encountered was keeping the chicken batter from crossing from golden brown to burnt brown with the oil temp at 375 degrees F. I used a high-end meat thermometer to measure the oil temp in my cast iron skillet and had it dialed in at the recipe’s recommended temp. However, it started to get really dark, dark brown and hardened after no more than 5 minutes. I dumped out the oil, and started fresh, lowering the temp on the gas burner to medium low, and keeping the temp around 325-330. The chicken remained golden brown, and was able to thoroughly cook for 20 minutes. Has anyone else encountered this problem?
Hey Richard 375 is never a good temp to fry chicken ever!!it’s always best to fry chicken at between 325-350ish…..unless what happened was you were frying a tester chicken to see how it would fry…my suggestion is to pre heat to 350 and when you start adding chicken pieces your temp should drop but stay between 325-350…hope this helps
Its never a good idea to fried chicken at 375….pre heat at the highest 350…when you start the frying process the oil temp unusually drops to to between 325-335 …you don’t want you temp going above 350 or lower than 325 while frying.
Is this chicken spicy?
Not really.
I loves southern fried chicken and I am going to try this recipe and I would love to get the chicken alfredo recipe too
Awesome! Here is the chicken Alfredo recipe https://www.africanbites.com/chicken-alfredo/. Do let me know how it works out for you.
We just made this tonight and it was incredible – THANK YOU!
I can’t believe the best fried chicken I’ve ever eaten was made in my own kitchen! Seriously, so happy to have found your recipe!!
You should see my happy dance now. 😀 Thank you for taking the time to let me know, Lori. I appreciate it.
What oil do you recommend?
I used vegetable oil.
I am making this tonight. I’ve had my chicken marinating for 24 hours now. Only problem I’m having, is I can’t find my thermometer to make sure the oil is proper temp.. any secrets or suggestions on how to achieve the proper temp without the thermometer?
Hi, Larissa. There are couple ways to check proper oil temp without using a thermometer. you can read it more HERE >>> https://www.thespruceeats.com/cooking-oil-heat-2356059
This recipe is fantastic! Tried it for the first time last night, very much a success, thanks!
Glad it turned out well for you, Sophia! Thanks for stopping by.
Question about this:
1- 1 1/2 tablespoon dried herbs Thyme, Oregano, Parsley
1/2 tablespoon each herb or
1 1/2 each herb?
That 1-1 1/2 tbsp is a combination of those dried herbs.
Could I use sage in this recipe?
You sure can.