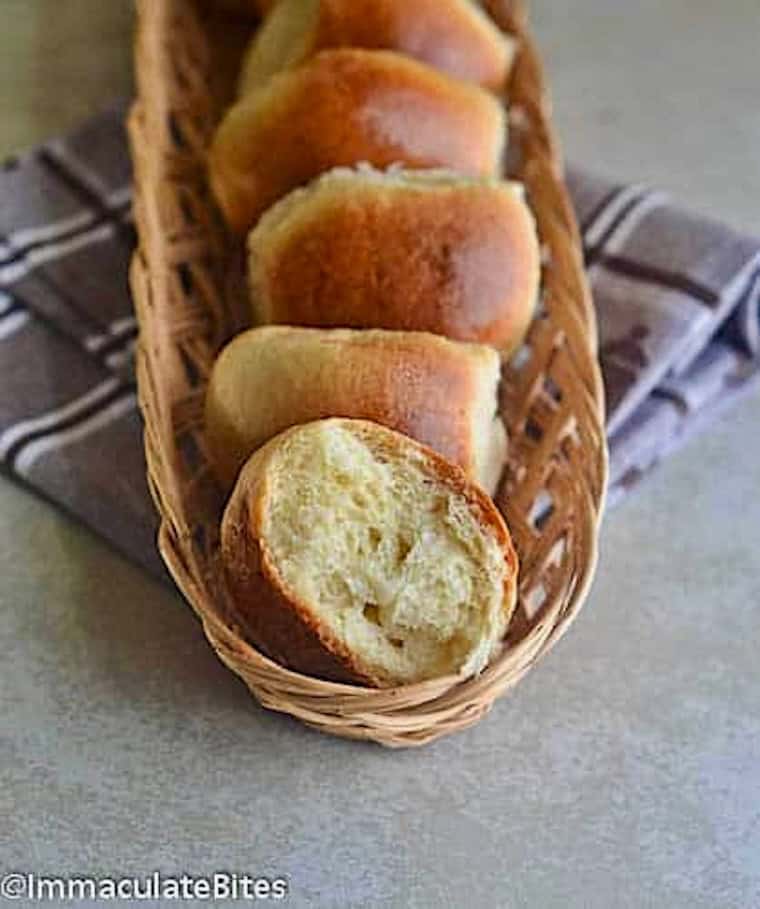
Sweet Bread Rolls
These pillow-soft sweet bread rolls have a lightly golden crust and tender crumb. Effortless and satisfying for that perfect side that completes any meal. And you can even do this with or without a mixer.
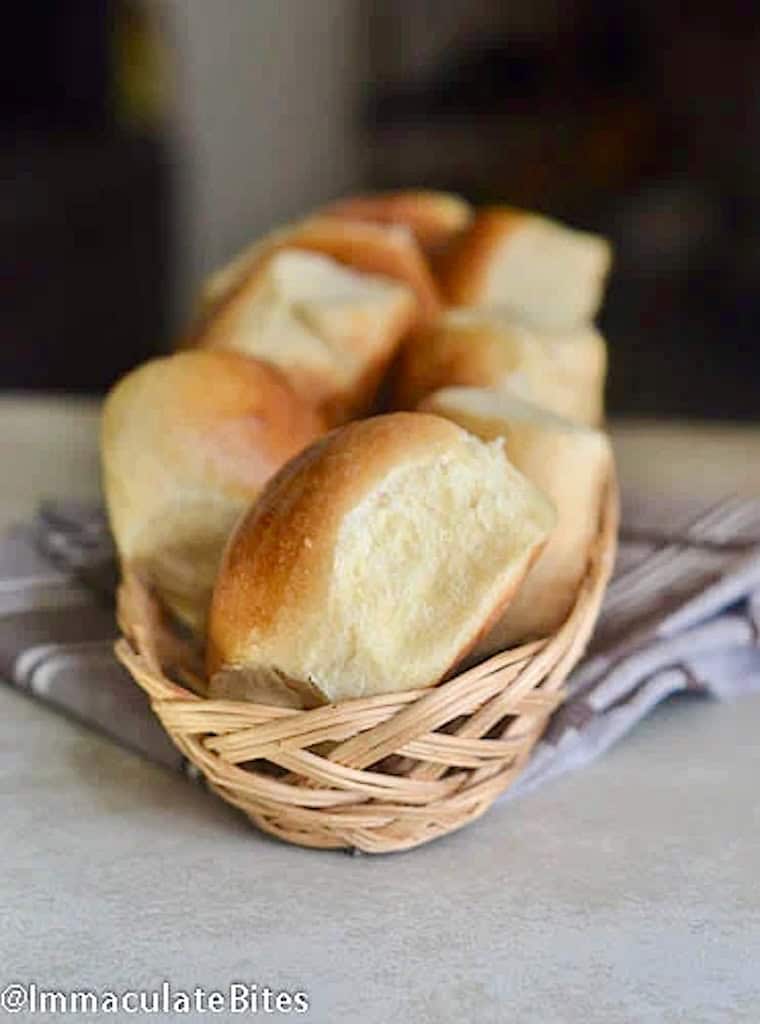
Nothing beats homemade bread. The aroma fills the kitchen, the warmth of the oven heats the house, and the memorable taste is priceless. I remember, as a teenager, making several trips to my neighborhood stores – walking tirelessly as far as a mile in search of sweet bread. Yes, that was a bit of walking, but for me, it was worth it!
I started baking this mouthwatering bread a couple of years ago, and ever since then, I’ve never bought sweet bread rolls at the grocery store again. It’s enjoyable to make them in different shapes or just bake them in a loaf pan for sandwich bread.
Is a Stand Mixer Necessary?
A stand mixer or food processor makes the job a lot easier, but it’s not essential for great bread rolls. In fact, some people see kneading as therapy, and the little elbow grease is excellent exercise. Sometimes, I make it without one, and no one can tell the difference.
How to Make Amazing Bread Rolls
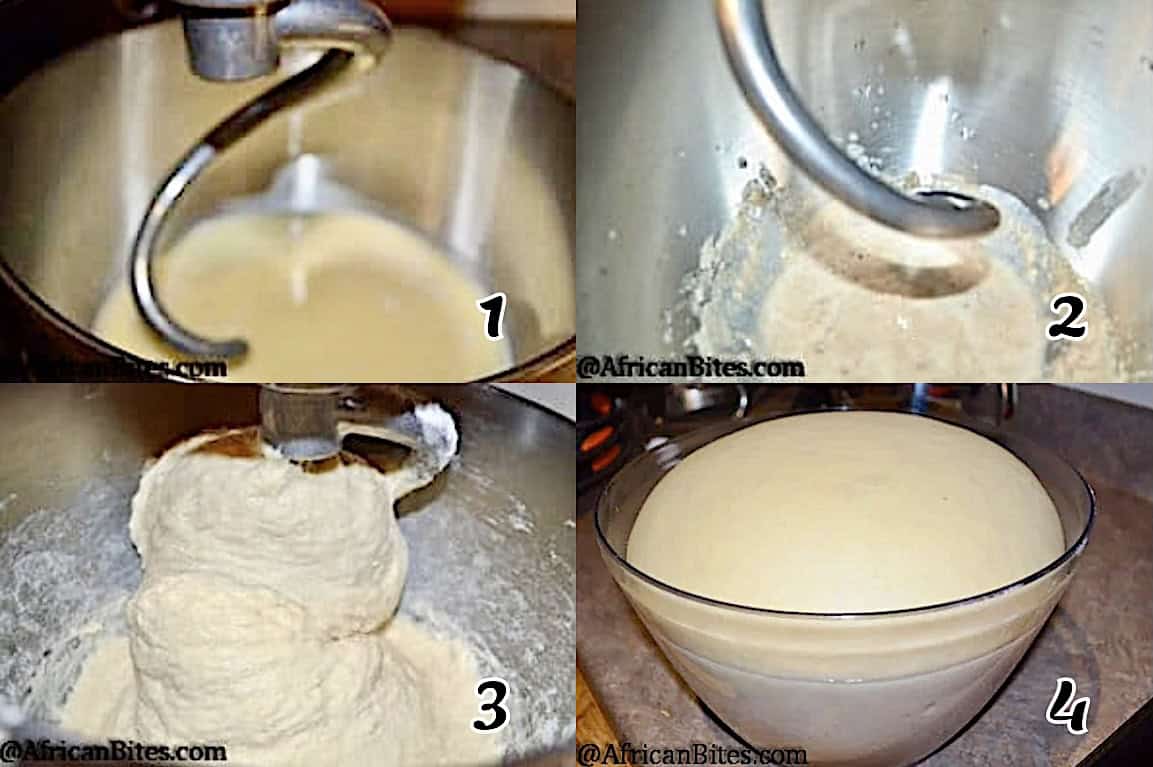
- Activate the yeast in lukewarm water. (Photo 1)
- Heat the milk, butter, sugar, and salt in the microwave for about a minute. Stir until everything melts. Let it cool if it gets too hot, so it doesn’t kill the yeast and curdle the egg.
- Whisk the honey and egg into the butter mixture.
- Mix it with the yeast mixture for 2 minutes at medium speed. (Photos 2-3)
- Add 2 cups of bread flour and mix well. Then add 1½ cups of all-purpose flour, and continue mixing the dough until it doesn’t stick to the sides or bottom of the bowl when kneading.
- Knead the dough on a lightly floured surface for 8-12 minutes. Place the dough in a greased bowl, turning once to coat. Cover loosely with a clean cloth and let rise in a warm, draft-free place for 1-2 hours or until doubled. (Photo 4)
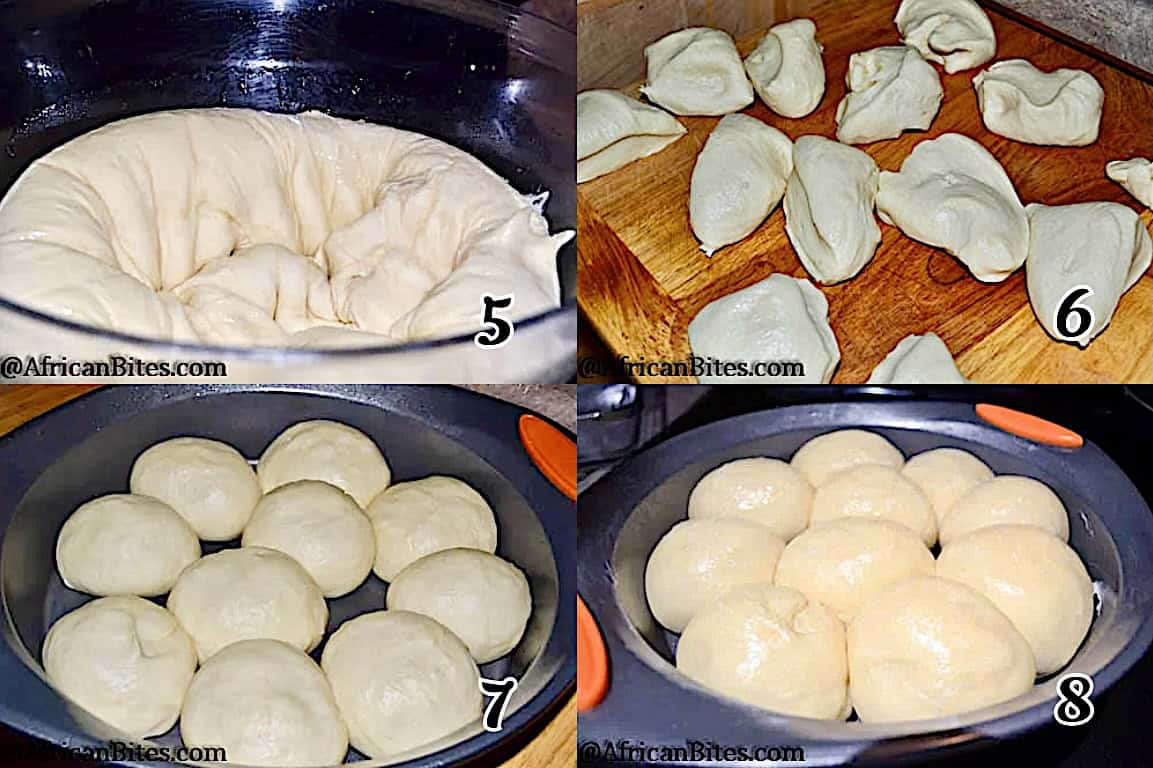
- Punch the dough down, knead briefly, and refrigerate covered for 30 minutes. (Photo 5)
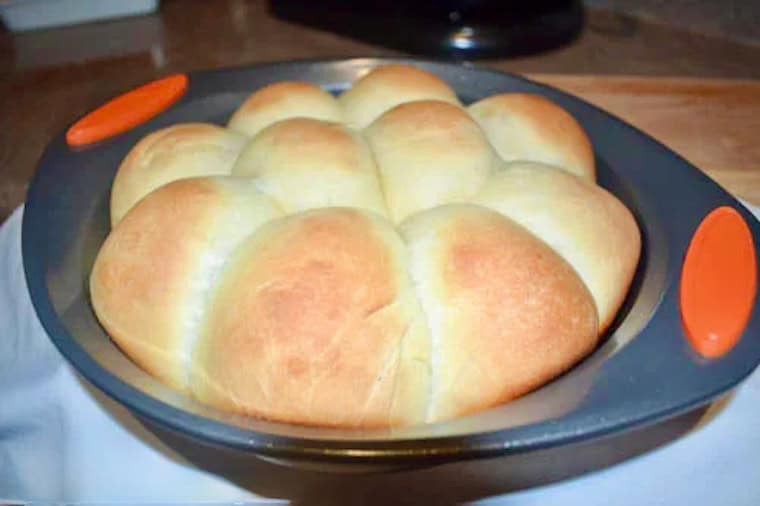
- Divide the dough into 12 equal pieces, shape them into balls, and put them in a greased 12-inch round pan. If baking soon, let them rise until almost doubled. Depending on the weather, it usually takes 30-40 minutes. (Photos 6-8)
- Preheat the oven to 350℉ (180℃).
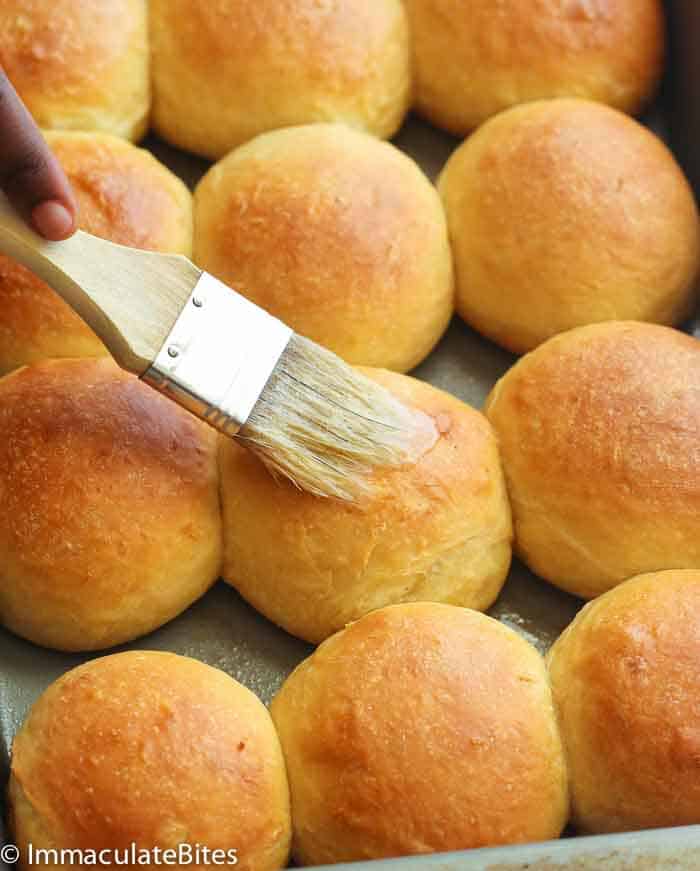
- Brush the top of the rolls with melted butter or milk.
- Bake until the crust is deep golden brown and the bottom of the rolls sounds hollow when tapped, 20-25 minutes.
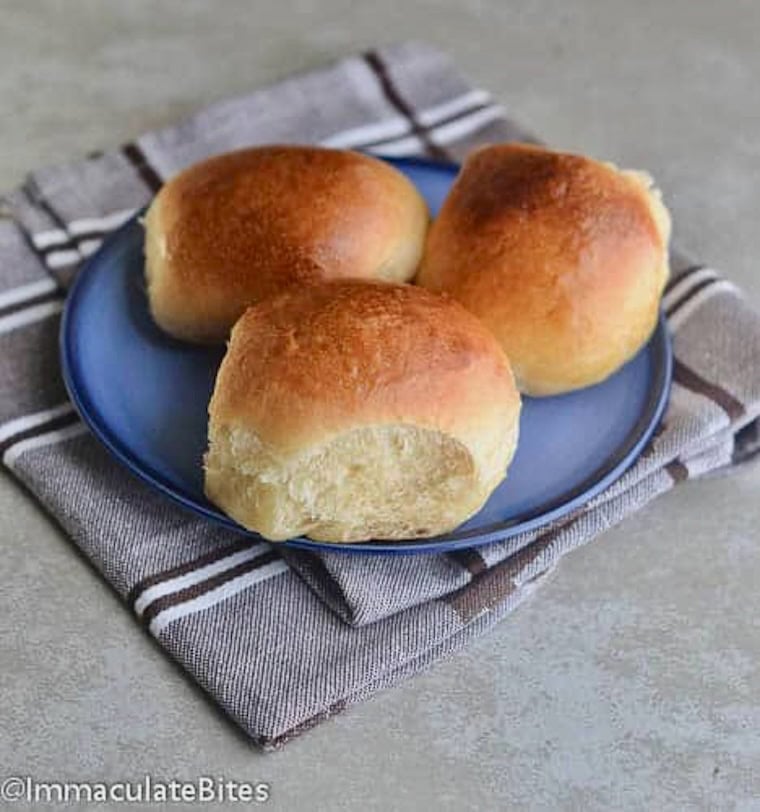
- Remove from the pan, let them cool, and serve warm.
Tips for Perfect Bread
- For bread recipes, a kitchen scale is a lifesaver. Baker’s math isn’t as hard as it seems, but you can go by feel if you must.
- Lightly flour the countertop to avoid getting too much flour in the dough.
- Knead the dough well. As the gluten develops, it will stop being so sticky, and you won’t need as much flour for moister rolls.
- Don’t skip the butter or milk wash on top. You could even beat an egg with a little milk for a more golden crust.
Make-Ahead Instructions
There are two ways to make these rolls ahead. Make the dough and let it rise in an airtight bowl for a day or two in the fridge. I’ve even left the dough for almost a week, and it only got better.
Or make the rolls and bake them until barely golden. They’ll last in the fridge for 3-4 days or in the freezer for 3-4 months. Finish baking them when you’re ready to serve for freshly baked bread.
Perfect Pairings
These honeyed rolls are an embodiment of crusty, golden, and tender American rolls served with steak and potatoes. They’re a perfect accompaniment to a light salad or breakfast. My son would eat this all day if I let him.
More Comfort Food Bread Recipes to Enjoy
My inspiration came from the milk bread recipe in one of my favorite cookbooks, Joy of Cooking. I made a few minor tweaks by including honey and adding more butter.—Imma
Sweet Bread Rolls
Ingredients
- 1 package active dry yeast (or 2¼ teaspoons)
- 3 tablespoons (45ml) warm water, the best temperature is 105-115℉ (40-46℃)
- 1 cup (236ml) warm milk, also 105-115℉ (40-46℃)
- 3 tablespoons (36g) sugar
- 3 tablespoons (36g) honey
- 5 tablespoons (42g) butter, cut into pieces
- 1 teaspoon (6g) salt
- 1 large egg
- 2 cups (240g) bread flour (see notes)
- 1½-2 cups (180-240g) all-purpose flour
- melted butter for brushing the top
Instructions
- In a stand mixer, combine the 3 tablespoons of lukewarm water and yeast. Let it sit until dissolved (about 5 minutes). Mix for about a minute with the mixer. A hand mixer or a mixing spoon will do fine, just take a little more muscle.
- Meanwhile, in a medium microwave-safe bowl, combine the milk with the butter, sugar, and salt, and microwave for about a minute. Stir until everything melts.
- Lightly whisk in the honey and egg to the butter mixture (if the mixture is too hot, let it cool to lukewarm to prevent the eggs from curdling.
- Dump everything into the yeast mixture. Mix for 2 minutes at medium speed.
- Add 2 cups of bread flour and mix well. Then add 1½ cups of all-purpose flour, and continue mixing the dough until it doesn't stick to the sides or bottom of the bowl when kneading.
- Add just enough flour as needed to make a soft dough. Less is better, and it's better to knead it well instead of adding more flour.
- Turn the dough on a lightly floured surface and knead for 8-12 minutes or more for airy bread. Place the dough in a greased bowl, turning once to coat. Cover loosely with a clean cloth and let rise in a warm, draft-free place for 1-2 hours or until doubled.
- Punch the dough down, knead briefly, and refrigerate covered for 30 minutes. Divide the dough into 12 equal pieces, shape them into balls, and put them in a greased 12-inch round pan. If baking soon, let them rise until almost doubled. Depending on the weather, it usually takes 30-40 minutes.
- You can refrigerate them before baking for up to 24 hours, or let them rise and bake them as soon as they're ready.
- Preheat the oven to 350℉ (180℃).
- Brush the top of the rolls with melted butter or milk. Bake until the crust is deep golden brown and the bottom of the rolls sounds hollow when tapped, 20-25 minutes.
- Remove from the pan and let them cool. I like to eat mine while they're still warm.
Tips & Notes:
- If all you have is bread flour or all-purpose flour, that will work. The texture may be slightly different, but the rolls will still be great.
- Make sure your liquids aren’t over 115℉ (46℃) because they will kill the yeast and scramble the eggs.
- You can replace half of the flour with whole wheat flour for a healthier version.
- Instead of making rolls, you can shape the dough into a loaf and place it into a greased loaf pan seam side down. Brush the top of the loaf with melted butter or milk, and bake until the crust is deep golden brown and the bottom of the loaf sounds hollow when tapped, 40-45 minutes.
- Please keep in mind that nutritional information is a rough estimate and can vary greatly based on the ingredients used.


Delicious!!! I made these today. Used all bread flour, that’s what I had.
Thank you!
Hello
Discovered your site it’s fabulous the recipes are fantastic. I now make my own seasonings thanks to. I wanted to know can the sweet rolls be made a day ahead.
Thanks
Diana
London
UK
Hi Diana! They sure can. Make it let it rise and place in the fridge until ready to use. You can also make and freeze on tray , in a single layer. After it’s frozen put in zip loc or air tight container- freeze up to a month , for best results. Here’s the trick , you have to bring it to room temperature before baking. Leave it in the fridge over night , on a tray , in a single layer. Then when ready to make remove and bring to room temperature . Hope this helps
Hello,
I see that the recipe calls for both bread flour and all-purpose flour. Is it possible to use only all-purpose flour, and if so, how would that change the flavor/texture?
Thank you.
Hi Gina! Yes, you sure can! Only slight difference in texture- recently I have been making it without bread flour and no one is complaining .
Please I need your advice on the best countertop type of oven for baking bread and cakes. Should I get a fan assisted convection oven? And please what brand(s)? Thanks in anticipation.
P.S. I live in Nigeria.
Yes, a fan assisted convection is good. Don’t know much about the brands in Nigeria. I have cusinart and it works just fine.
Hmmmm, step 7/8 should I let dough rise once shaped and in baking pan before I bake?
Yes, give it some time to rise, in order to get a fluffy interior.
Thanks much. I have baked this twice 🙂 Making it a third time but substituting whole wheat for the all purpose.
I love these bread rolls too! I have used wheat flour before but never used 100% always 50/50. Thanks for the feedback!
where did you get this 12 inch baking pan
I got it from Amazon.
I am not sure what to do with the honey. When do I add it?
You add the honey in the butter mixture, before adding the eggs.
The ingredients – I don’t understand the second point
– Is it 3 tablespoons of warm water or 105-115 ml of warm water. Thanks
It is 3 tablespoons of warm water . The water temperature should be between 105- 115 degrees.